c h r o n o l o g i c a l
g u i d e
> Year 1 Year 2 <
> Year 3 Year 4 <
> Year 5 Year 6 <
> Year 7 Year 8 <
> Year 9 Year 12 <
fetching & dismantling
sandblasting & evil rust
right "b" pillar
fixing right inner sill
basic body repair, por-15
frame removed, footwell repair
hole fixed, car flipped, etc.
sill stiffeners, rear bulkhead, etc.
various small parts
left sill, added stiffener, etc.
- lousy weather
trunk floor (reprise)
right floor, left sill, etc.
left floor, wheel well, etc.
right upper wishbone
floor done, car righted
rack, front frame, evil rust
left door cleaned & fitted
right door, right suspension
bonnet, part 1
bonnet, part 2
bonnet, part 3
bonnet, part 4
bonnet, part 5, etc.
bonnet, part 6
bonnet, outer sill, etc.
lots of stuff
left side, bonnet internals
frame, bonnet attached
engine stand, oil pan removal
pistons removed, sanding
sanding, final filling
color, frames, primer
brushed primer test
2nd coat primer
holiday greetings!
finish prep, detail on dent fix
spraying primer
winter chores
1. undercoat, plating prep
2. plating, spraying color
bonnet, plate prep, cylinder head
cylinder head paint, bushes
plating saga
front frame, suspension, part 1
front suspension, part 2
front suspension, part 3
priming and painting
bonnet, part 7
painting color!
boot lid, steering wheel
gas tank
winter chores
1. firewall sundry
2. front suspension
3. steering setup
4. master cylinders/pedals
5. the rest
data plate screed
winter to spring
1. irs rebuild
2. trunk floor, harness
3. data plate (again)
data plate, door, headlights
dash vinyl, crosshatch aluminum
windshield, right door
interior, "widget"
chrome parts!
door handle details
rolling chassis
molasses rust removal
electrical, part 1
bores, thrust washers
new engine!
head differences
block differences
compression ratio
engine in place!
alternator
catchup & photos
it runs!
setback and brakes
darned close & engine diffs
driven
top and seats
driving and little stuff
|
|
| Rack (15 March 2003)
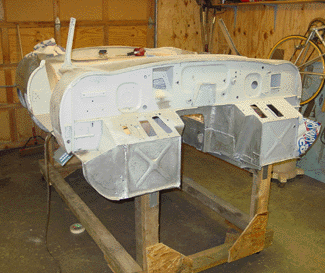
It would be nice to have a "rotisserie" to mount the car body on. Such things are do-able, and I've seen them around, but I've not wanted to invest the time into
 building such a fancy rotating mount for the car. I suppose it would be nice, but we'll flip this car over as need be. That said, I did need to create something
to make it easier to move the body out of the way when we weren't going to be working on it. I used lumber we had saved from an old chicken coop and four middle
duty casters from the lumber yard to build a rolling rack. It stands about two feet high, and it carries the car quite high — perhaps a little too high.
But it'll do. And it was really nice to be able to roll the car body to the side to sweep the floor and clean up. It'll practically be necessary once we need
to move larger parts (like the bonnet) out of the garage to work on. The fact that it's fairly high is also a nice feature, since I won't have to be bending down all
of the time to work on areas in the interior.
Aaron and I continued to disassemble the tubular steel frame, especially the right side suspension and frame pieces. We got everything apart, except for the lower
wishbone and the torsion bar. these are still stubbornly affixed to the frame. The wishbone is free, but it is held to the frame by the torsion bar. I suspect that
we're either missing a piece to remove or the thing is just plain stuck. We ran into some difficulty removing a couple of the larger bolts, and we had to resort
to heating up the nut after penetrating fluid failed to loosen things up. Heat worked like a charm. Thank goodness we have a pneumatic impact wrench!
Very Evil Rust (16 March 2003)
We did run into something I had dreaded, however.
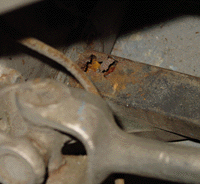
I was thinking that the tubular steel frame was untouched by rust, but that proved not to be the case. When Aaron and I flipped over the frame assembly in order to
get at some bolts more easily, we found two badly corroded areas on the left frame. One section near the picture frame (the central section the runs across the front,
 spanning the gap between the two side frames) was rusted through on the bottom. And a section below the battery area, on the underside of the tube, was rusted clear
through. This damage wasn't apparent from the top of the vehicle, though when everything was flipped over it was very easy to see.
I was hoping that I could avoid buying a new frame, since the things are pricey. But there is no way that I would attempt fixing this part. There is too much quite
literally riding on it to test my skills. The tubular steel was also a very high tensile strength, and I simply do not have the tools to do the job. I think that the
side frames cost around 750 USD, and I should be needing to get one. The right side frame looks very good. I'll know more about it after sandblasting it. I'm almost
afraid to see what lies under the old paint.
|
|

 building such a fancy rotating mount for the car. I suppose it would be nice, but we'll flip this car over as need be. That said, I did need to create something
to make it easier to move the body out of the way when we weren't going to be working on it. I used lumber we had saved from an old chicken coop and four middle
duty casters from the lumber yard to build a rolling rack. It stands about two feet high, and it carries the car quite high — perhaps a little too high.
But it'll do. And it was really nice to be able to roll the car body to the side to sweep the floor and clean up. It'll practically be necessary once we need
to move larger parts (like the bonnet) out of the garage to work on. The fact that it's fairly high is also a nice feature, since I won't have to be bending down all
of the time to work on areas in the interior.
 spanning the gap between the two side frames) was rusted through on the bottom. And a section below the battery area, on the underside of the tube, was rusted clear
through. This damage wasn't apparent from the top of the vehicle, though when everything was flipped over it was very easy to see.