|
firewall sundry ||
front suspension ||
steering setup ||
master cylinders/pedals ||
the rest
Master Brake/Clutch Cylinders and Pedal Assembly
I will remove suspense: two of the three master cylinders are all toast, victims of corrosion. The rest of the assembly is in pretty decent shape — nothing that a little paint remover, sanding, wire-brushing,
and painting can't take care of.
The master cylinders were a bit of a blow, though. Since they needed replacement, I wondered if I should just upgrade the brakes entirely to the 4.2 setup, since it was apparently more reliable and responsive.
I decided not to upgrade; we'll keep this one more or less as it rolled off the line.
I went ahead and ordered a clutch master cylinder as soon as I took the old one apart enough to see the mess
it was inside. I ordered it from Terry's Jaguar and it arrived a couple of days later, in fact much sooner than I had
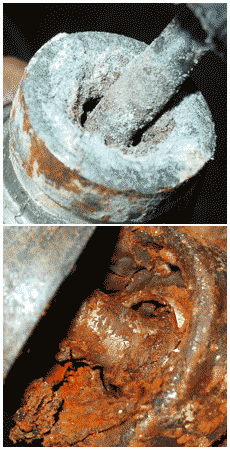 expected. It is very nearly identical to the original. I decided to take a look at the other master cylinders for the brakes before ordering
replacements. One has already been resleeved in brass, and it was bright and shiny without a score mark. The plunger and various innards need attention, though. The other one
seemed never to have been touched and was much worse off. Although much of the inside of the cylinder was clean, there were score marks concentrated in one area. It needs either
replacement or resleeving. I emailed Terry's Jaguar to see if they do resleeving and to see whether the metal internals are included in the master cylinder kits. Jerome replied that they don't resleeve and the
kits include only the rubber seals and the "dust cover."
expected. It is very nearly identical to the original. I decided to take a look at the other master cylinders for the brakes before ordering
replacements. One has already been resleeved in brass, and it was bright and shiny without a score mark. The plunger and various innards need attention, though. The other one
seemed never to have been touched and was much worse off. Although much of the inside of the cylinder was clean, there were score marks concentrated in one area. It needs either
replacement or resleeving. I emailed Terry's Jaguar to see if they do resleeving and to see whether the metal internals are included in the master cylinder kits. Jerome replied that they don't resleeve and the
kits include only the rubber seals and the "dust cover."
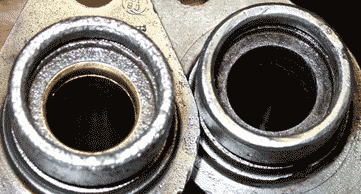 So, at this point, I think I can use a master cylinder rebuild kit for the good, already resleeved master cylinder. I will simply cannabalize the best metal internals from the two cylinders. I'll
probably go with a new master cylinder for the other.
So, at this point, I think I can use a master cylinder rebuild kit for the good, already resleeved master cylinder. I will simply cannabalize the best metal internals from the two cylinders. I'll
probably go with a new master cylinder for the other.
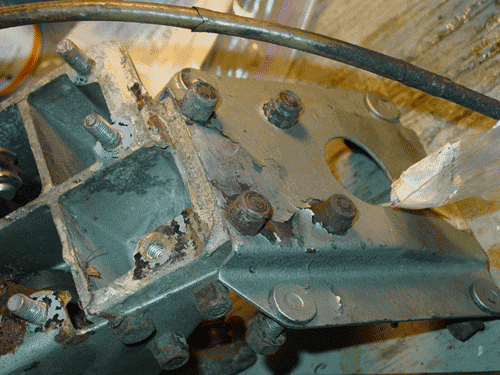
The pedal assembly itself consists of an aluminum housing that holds both the brake and the clutch pedals, and the housing also accepts the clutch master cylinder as well. A bent steel
attachment sits next to the aluminum housing and serves to encase the brake pedal linkages (which are quite complex) and hold the twin brake master cylinders. The steel attachment is painted
with "hammered" grey paint. Adjacent to the firewall
and attached to the aluminum housing is a plate that holds the Dunlop vacuum brake assist bellows. This bellows set up was fairly short-lived in the history of the E-type, since
 it barely survived the 3.8 liter engine version of the car. The bellows themselves were manufactured by Dunlop, and the whole arrangement has been characterized as somewhat
unconventional.
But I have to admit that it seems pretty straight-forward, even though the 4.2 setup (from Lockheed, I think) is said to have provided about 40% better assistance with braking. The bellows system does
appear not to be as scrupulously backed up and redundant as the 4.2 brakes. I considered upgrading to the newer system, which was carried over through the remaining
history of the E-type, more or less intact, if I recall right. But I decided the pedal and braking installation was too visible to replace. I'd look at it and think it was too much of
a compromise from the old 3.8 Series I.
it barely survived the 3.8 liter engine version of the car. The bellows themselves were manufactured by Dunlop, and the whole arrangement has been characterized as somewhat
unconventional.
But I have to admit that it seems pretty straight-forward, even though the 4.2 setup (from Lockheed, I think) is said to have provided about 40% better assistance with braking. The bellows system does
appear not to be as scrupulously backed up and redundant as the 4.2 brakes. I considered upgrading to the newer system, which was carried over through the remaining
history of the E-type, more or less intact, if I recall right. But I decided the pedal and braking installation was too visible to replace. I'd look at it and think it was too much of
a compromise from the old 3.8 Series I.
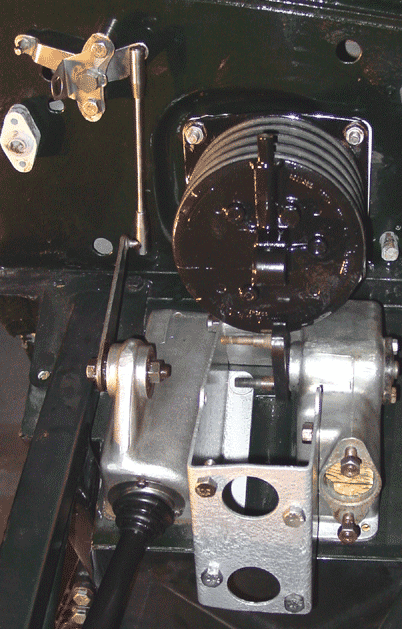
I put the clutch/brake pedal assembly into place just for the sake of taking a picture. I figured that the work that was still to come would be easier at the bench than hunched over the car.
That work involves fitting the master cylinders, once they're ready. The clutch master cylinder from Terry's is already where it should be, though it remains unattached to the pedal.
That installation is no big deal, but the redoing of the complex brake pedal linkages is another matter. I removed the linkages intact, and then subsequently disassembled them for
cleaning and renewal. (Nylon bushes need replacing mainly.) When I was removing the crud and the rust, I ran into yellow chromate finish. I recall that being mentioned in relation
to the brakes, and so I'm going to do a yellow chromate finish on the linkage. Then it's a matter of completely assembling and installing the whole part on the car. I think that will
get done sometime between now and March. Getting the linkages set correctly to the cylinders might be a bit of a challenge. There is one adjustable "fork" on a
push rod that is supposed to be set. I won't attempt that until there's actually fluid in the lines, of course.
There is another pedal, too; and it isn't something to overlook: the accelerator. That was a simple and easy matter of cleaning up the pedal assembly and beginning the
cleanup of the throttle linkages, one of which is visible in the picture. I've kept the linkages and the pivots raw steel. I waxed them to give them some protection from the elements,
and I'll try to keep them protected in the garage, too. The steering rod goes through the front end of the throttle pedal housing, and the interior of the car is protected from exposure
with a rubber "gaiter" that's fitted to the pedal housing. It is an elegant solution to getting steering into the car. I think it's these little things that add up to a form of art
that the E-type embodies: elegant use of space. (At least in this little detail!)
|
