|
Dash Covering
I got a yard of black vinyl from World Upholstery & Trim. It comes in 54-inch widths, and a yard is more than sufficient for the dash. In fact, if I had not been so paranoid
about cutting too small, I may have been able to do two sets for this and earlier cars at least, since the center instrument panel was still trimmed in
aluminum. Later models used vinyl in the center as well, though there is considerable confusion about when the switch from aluminum to vinyl actually took place.
Owners of cars produced from late summer to fall 1963 report various trim configurations, and the factory assembly may have been a bit unstructured and haphazard during
the transition to vinyl.
I think it was an obvious "upgrade" in the mid-1960s to hide the crosshatch aluminum beneath a vinyl covering once the aluminum had shown wear. That, in fact, was
probably encouraged when newer models of the E-type used vinyl — the vinyl covering looked like the newer models, after all.
We took off a tan vinyl covering that had been added by a previous owner, and beneath the tan vinyl lay the aluminum. With some considerable luck we might have been
able to clean up, re-anodize, and reuse the aluminum, but it had been drilled, scratched, and otherwise violated. The aluminum surface is easily damaged, and so I can understand why
Jaguar might have wanted to switch to vinyl. It's durable and resilient to bumps and scratching, and — probably the overriding factor — it's undoubtably
cheaper.
It's worth noting that vinyl comes in a huge range of qualities, and I easily found much cheaper vinyl than what I got from World Upholstery. The cheaper products
were obviously cheaper for a reason: backing was flimsy, thickness varied, vinyl toughness was marginal, and often the embossed pattern lacked depth.
A note about vocabulary: "dash" often refers to the top, facing up toward the windshield, and the three vertically facing pieces that house the instruments and access
to the glove box. I try to be specific, though I'm sure I slip up and use terms interchangably. (As someone usually says at this point: "Can't you see my hands waving?")
I have seen the central portion of the dash — where the ignition and smaller dial instrumentation is located — referred to as the "minor instrument panel."
I'm assuming that the panel immediately forward of the steering wheel, whether on the right or the left, would be the "major instrument panel." I've also heard the
central (or "minor") instrument panel referred to as part of the console. Pictures are, indeed, worth a thousand words of explanation, I've come to learn.
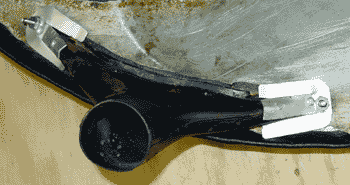
The top of the dash has a foam backing laying beneath the black vinyl covering. The other sections of the dash — the major instrument panel and the glove
box access — do not include foam, but are simply black vinyl glued to the steel. On models after 1963, and on some transitional portion of the 1963 year cars, the minor instrument
panel is covered with black vinyl as well.
My car, it turns out, was made at the beginning of the transition. Unfortunately, it was modified by a previous owner, so it's well nigh impossible to figure out
the original configuration of the minor instrument panel. The tranny cover console, and the forward "radio" or "speaker" console have crosshatch aluminum panels
beneath the vinyl. It's tempting to do the black vinyl over the minor instrument panel, but the fact of the matter is that I like the aluminum and want to see if I can
scare up the correct crosshatch for it and the other sections.
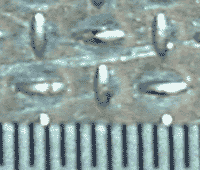
Crosshatch Aluminum
The 1963 E-type had a crosshatch pattern on the aluminum facing for the center console and the central instrument panel. That crosshatch is really hard to find,
though it seems to be available through the Aston Martin Heritage services. (The link is http://www.astonmartin.com/parts/heritage. Mac OS X Safari will not work, incidentally.) Dan Mooney at Classic Jaguar was able
to get sheets at a dear price that he didn't specify.
Here's what it looks like at about 15X:
I wrote to Aston Martin about the crosshatch pattern, and the correspondence itself was an interesting example of specialized vocabulary, some of which no doubt arose
from the working history of the company. I inquired about the crosshatch design that appeared on the DB4/DB5/DB6. I got the response that it was indeed available and that
I could view the product in a PDF attachment. However, the pattern was called "polka dot" and the picture had insufficient resolution to see the pattern at all. Thinking
I hadn't made myself clear about the pattern, I asked for confirmation.
Sure enough, "polka dot" is also "crosshatch" according to Aston Martin. Or, perhaps more correctly, "crosshatch" is really "polka dot." Mark Hewitt of the Aston
Martin Heritage division sorted it out. "Sorry for the confusion," he replied. "Polka dot is an in house name we use but it is indeed cross hatch design as used
on DB4/5/6. This is to the original design and look." It is available only through
Aston Martin authorized dealers, part number 695288. It comes in sheets sized 1250 x 410 millimeters (49.1" x 9.8"), and, no, I don't know about a salvage at the edges.
On the Aston Martin cars, this aluminum pattern was used for door and sill trim.
To fashion the central aluminum sections for the 1963 E-type interior, you'd need to get two sheets. If you don't do the minor instrument panel, you might be able to
do the job with one sheet, though it would be tight.
I am hoping that Classic Jaguar might make the crosshatch aluminum trim available again.
|
Foam and vinyl covering of dash
Dash top
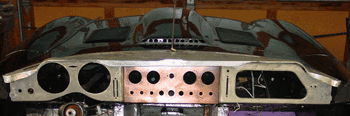
The whole metal frame for the dash interlocks nicely. The steel pieces are covered with black vinyl, and the copper plated center section
is covered with aluminum — this model year sported a "crosshatch" pattern that is really difficult to find.
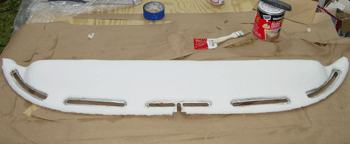
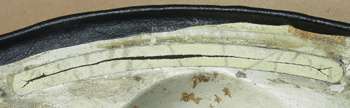
Getting the foam onto the dash was quite easy. It's really just a matter of laying out the foam (I used 1/2 inch
thickness) and then tracing the vent holes and outlining the entire dash with a generous border. Then, cut the foam vent holes about 3/8 inch broader
than the outline. The rest is a matter of applying contact cement to both the foam and the metal. I found that the "gel" formula contact cement was easiest to use, since
it isn't as easily absorbed into porous material, like vinyl backing or foam. It is prudent to check to see whether the contact cement formula reacts with
either foam or the vinyl. Do a test, since you don't want your materials to melt away before your eyes.
Apply the foam to the metal, beginning with
the center vent hole, moving outward to each vent hole, and then finally moving "back" to face of the dash. The key is to get the vent holes aligned right.
If you have cut the foam generously, you can adjust quite easily. The last part is cutting the outlined edge. I cut the edge as if to bevel the edge slightly.
Contact cement goes on the back of the vinyl and on the foam and in the exposed metal around the vents. One caution: Carefully apply the contact cement to the foam, especially. If too much of it is
applied, it can seep into the foam slightly, even though the foam cells are supposed to be sealed. If that seepage occurs, the foam can begin to stick to itself internally,
causing a depression on the surface (and in your psyche, too). Using a gel formula contact cement helps avoid this, simply because the cement is so thick it
doesn't spread or seep as easily. Light and quick strokes of the brush help.
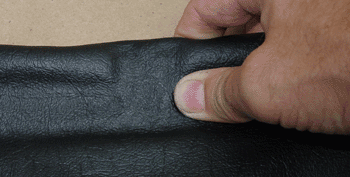
When affixing the vinyl, I think it's best to begin with the vents at the front of the dash. As with the process of setting the foam on the metal dash, begin with the
center vent and then move outward to the vents at the edges. At this point I didn't bother wrappiing the vinyl around the metal. I just worried about getting the
top surface smooth and wrinkle free. After the forward (vent) edge of the dash was firmly fixed, I moved toward the back edge of the dash — the edge that
faces the car's interior. When you apply the vinyl be sure to avoid uneven tension of the vinyl, since that can cause the dash to become wavy. Take your time and watch carefully.
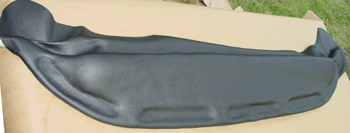
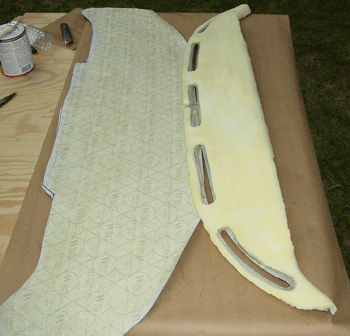
You can see the final product emerging, but you can also see how generous I was with the vinyl. I trimmed a good four inches (ten centimeters) off the back edge
of the vinyl by the time I was done. Appearances are a little deceiving here, though. The picture makes it look as though I had already wrapped the forward edge of the
vinyl around the metal. This was not the case, but the vinyl had curled around the forward edge because of the gentle stretching that I did while applying it.
At this point, I hadn't even put contact cement on the underside of the dash.
I decided to make edges of the vent openings fold to the underside of the metal. This meant applying contact cement to the underside areas and slitting the center
of the vent. Note the "dart" at each end of the vent hole. You can actually cut a little closer to the metal edge. If I were to cut this again, I believe I would
have made the dart a little longer, since it's easier to attach a longer piece to the underside. You can see that I had wrapped the edges of the vinyl already.
Now, the vent opening can also be cut open flush with the metal edge. Since the outside surface has a bronze fitting to outline the vent hole,
the metal will not be visible, and the chance of a peel-back of the vinyl is minimized.
The original setup may have had the duct inserted up through the duct hole before the vinyl was cemented in place. I don't know. I do know that
the setup I took apart was flimsy and it most assuredly was a redo from the original, since the vinyl I took off wasn't black but tan. The original metal pieces that trim up the
vent holes are made of bronze and painted black. They were probably originally attached with sheet metal screws.
I chose to do the attachment of the duct from below using aluminum clips and contact cement. Not only did this make the trimming of the dash a
little easier, but I think it would make eventual replacement of a duct piece easier.
The clips holding the duct in place are attached with a machine screw and nut which replaces the original sheet metal screw. The edges of the duct not covered by
the clip need to be glued, so they don't wander into the hole or otherwise separate from the surface.
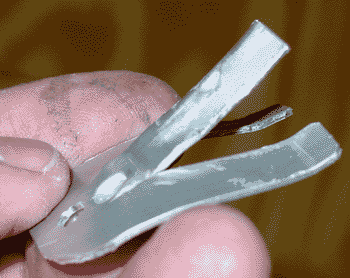
The clip was a simple matter of cutting with snips and a little shaping with pliers. The aluminum is 0.040" thick. Note that the bends of the feet-like tabs are made to exert some pressure when you
tighten the piece in place, though remember that aluminum isn't great as a spring metal. If you go this route, you'll need to make ten of these things, but you don't
need to alter the design for the corner vents that are rounded. The clip isn't long enough for the curve to matter on those.
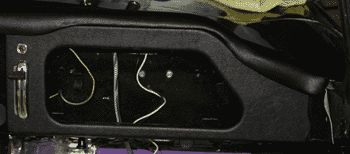
Glove box
The glove box and the major instrument panel in front of the steering wheel are also covered in black vinyl, though unlike the dash top they had no foam backing.
The vinyl just goes on the metal, and the trimming is quite easy.
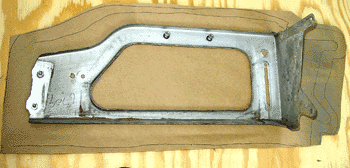
I decided to make a paper template for the dash pieces, since they have an angled surface as well. You can see how much I made the cutting wide, mainly because
I wanted to have too much material rather than too little. Since I had a full yard of the vinyl, I had plenty to work with.
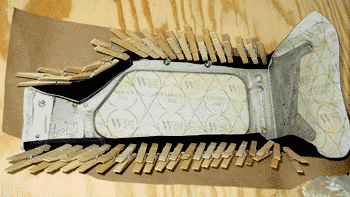
The vinyl having been cut from the template and the surfaces covered with contact cement, it was really just a matter of laying the metal piece onto the vinyl
and then methodically affixing the vinyl with finger pressure. I started applying pressure in central areas (though there isn't much of a central area on the glove
box hole!). Then I worked toward the edges. This picture shows a little innovation using clothespins. I clipped the perimeter where I have wrapped the vinyl over
the metal edge. It's probably useful to do this only on surfaces that are hidden from view, because the pressure of the clothespin can flatten the texture
of the vinyl. Indeed, the clothespin trick might not really be necessary at all, since contact cement, once pressed into place, sticks pretty well.
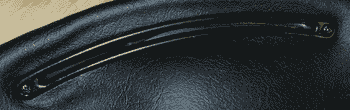
The choke control is in place, and I just laid the glove box piece into position and set the dash on top of it. Though it's obviously not in final position, the
image gives an idea of what the parts will look like when they're completely installed.
|
