c h r o n o l o g i c a l
g u i d e
> Year 1 Year 2 <
> Year 3 Year 4 <
> Year 5 Year 6 <
> Year 7 Year 8 <
> Year 9 Year 12 <
fetching & dismantling
sandblasting & evil rust
right "b" pillar
fixing right inner sill
basic body repair, por-15
frame removed, footwell repair
hole fixed, car flipped, etc.
sill stiffeners, rear bulkhead, etc.
various small parts
left sill, added stiffener, etc.
- lousy weather
trunk floor (reprise)
right floor, left sill, etc.
left floor, wheel well, etc.
right upper wishbone
floor done, car righted
rack, front frame, evil rust
left door cleaned & fitted
right door, right suspension
bonnet, part 1
bonnet, part 2
bonnet, part 3
bonnet, part 4
bonnet, part 5, etc.
bonnet, part 6
bonnet, outer sill, etc.
lots of stuff
left side, bonnet internals
frame, bonnet attached
engine stand, oil pan removal
pistons removed, sanding
sanding, final filling
color, frames, primer
brushed primer test
2nd coat primer
holiday greetings!
finish prep, detail on dent fix
spraying primer
winter chores
1. undercoat, plating prep
2. plating, spraying color
bonnet, plate prep, cylinder head
cylinder head paint, bushes
plating saga
front frame, suspension, part 1
front suspension, part 2
front suspension, part 3
priming and painting
bonnet, part 7
painting color!
boot lid, steering wheel
gas tank
winter chores
1. firewall sundry
2. front suspension
3. steering setup
4. master cylinders/pedals
5. the rest
data plate screed
winter to spring
1. irs rebuild
2. trunk floor, harness
3. data plate (again)
data plate, door, headlights
dash vinyl, crosshatch aluminum
windshield, right door
interior, "widget"
chrome parts!
door handle details
rolling chassis
molasses rust removal
electrical, part 1
bores, thrust washers
new engine!
head differences
block differences
compression ratio
engine in place!
alternator
catchup & photos
it runs!
setback and brakes
darned close & engine diffs
driven
top and seats
driving and little stuff
|
|
|
Compression ratio test
I actually have the engine pretty much complete. The value covers are still off (more on that sometime later) and I need to get a crankshaft pulley
(really, a matter of ordering it, but more on that below). I figured that I had some catching up to do, and the compression ratio tests seem a
good place to start.
Ray Livingston has developed an easy way to find out the actual compression ratio on XK engines. There are a few measurements that are
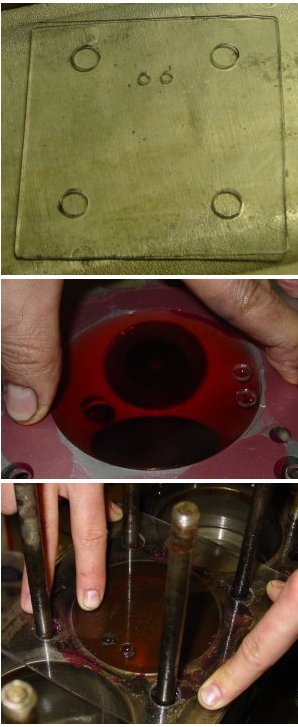 required, and a little fabrication is necessary. That fabrication consists of making a plexiglas cover for the bore and hemispherical
head space. I made mine with scrap plexiglas that we had laying around.
required, and a little fabrication is necessary. That fabrication consists of making a plexiglas cover for the bore and hemispherical
head space. I made mine with scrap plexiglas that we had laying around.
With a nice request, Ray will supply the spreadsheet that required to interpret the results of the measurements, and the very good instructions he
sends with the spreadsheet include how to take the measurements with the head in place or not. So, it's entirely possible to chase down the pinging
problem of your XK-engined Jaguar with the head in place and Ray's instructions in hand.
The plexiglass tool serves one purpose: it levels out and holds liquids that are poured into the bore and the hemispherical chamber in the head.
You need to drill holes to allow the head studs to go through (if you haven't taken them out), and you need two holes to manage the liquid you
use to measure capacities. One of these is for liquid to go in, and the other is for air to come out. I made the piece by just cutting a square
of roughly the right size and then laying it on the inverted cylinder head to locate the stud holes and the two liquid-related holes. The two
small liquid-related holes should be at the edge of the bore or chamber. You can use the stud holes to affix the plexiglas when you're doing
the filling with liquid, but I found that a firm press with my fingers was just easier to manage — I figured I'd spend more time making
the part than really was necessary.
The principle is to measure the unknown volumes by filling them with a liquid. Obviously, the volume of the cylinder head's combustion chamber
can be altered with machining. You shave your cylinder head to truth, and the effect is that the combustion chamber shrinks ever so little. You
do the same to your block, and the bores get just a little smaller in volume.
The process for me was very simple, since I had the head off. Ray provides instructions for measuring with the head on, but pay close attention
to his warnings and directions.
With the head off, you need the plexiglass tool, some grease (for sealing liquids in and the plexiglass tool on the surface of the head or block), a dial indicator
to measure the space at the top of the bore at Top Dead Center and to set the piston at exactly (Ray's emphasis) one inch from the deck of the block,
a "telescoping gauge" to measure the width of the bore, a vernier caliper, and
an accurate measure for the liquid. Ray suggests something called a "burette" with
about a 100 ml capacity, but I didn't have anything so fancy. Instead, I got a 100 ml
graduated cylinder from my friend Laszlo, and that worked just fine,
though I had to pour the liquid rather steadily. If I were doing this test frequently, I'd probably find a burette. Ray suggests using mineral spirits, too.
I started with the head, and I used colored water as the liquid. (I figured colored water would be easier to see.) I put some grease around the chamber
and around the valves. A spark plug was installed, too. Once I pressed on the plexiglass tool, the grease acted as a glue almost. Lateral motion of the
plexiglass was possible, but lifting it off the face of the head required some effort. As the chamber filled with water, I was careful to press the
plexiglass tool down against the face of the head, so there wouldn't be (that much) extra liquid to fill any space made by the float of the tool over the
grease.
Measuring the bore is a little more complicated, since you need to measure the distance from the deck of the block to the top of the flat part of the piston
at Top Dead Center. A dial indicator and a mount is needed. Then you bring the piston down one inch, wipe some grease to seal the piston and bore, and
do the liquid trick. For the bore measurement, I used motor oil. That was a little challenging, since it is viscous and your measurement can be confounded
by the fact that oil sticks to the side of the graduated cylinder. Also, the surface tension properties make it a little tougher to read the level of
the oil. You have to take the bore width measurement, too.
At any rate, I ended up taking measurements at least twice, and in the case of the head, probably four or five times before I was satisfied. To get a result
all you do it plug the numbers into Ray's nifty spreadsheet and choose a head gasket thickness. I'm using the "Payen" composite gasket (0.035" thick),
and I came up with a compression of 8.31:1. Remember, I have the 8:1 pistons in this engine.
The amusement of buying used parts
The XJ6 has different pulley styles from what I originally had. (Pages on differences of the 1963 3.8 liter engine and the 1979 XJ6 4.2 liter eninge
are available for the cylinder head and
block.) My 1963 E-type had "double groove" pulleys, and the crankshaft pulley
was entirely different, both in bolt holes and in fit. The crankshaft vibration dampners are different from E-type to XJ6. So, I was off in search
of a new crankshaft pulley. People the the Jag Lovers forum suggested Classic Jaguar as a source for new, and indeed that was the case.
But I wanted to check out used part sources. I have exchanged emails with "Marius" at Marguar Jag parts (an Ebay vendor), and he's
been responsive though hasn't had the parts I've needed. Since he didn't have the correct pulley, he suggested I contact Geoffrey Reis
at Jag Connection. That ended up generating an amusing email exchange that I publish here in entirety.
From: geoffrey@jagconnection.com
Subject: RE: 4.2 crank pulley, E-Type, "double grooved"
Date: July 17, 2007 10:24:26 PM EDT
To: mdelong@nc.rr.com
Mark. If a phony reproduction pulley is selling for (and worth?) $95, why
would the real thing, which is unreproduceable accurately, be worth less
than that? It makes no sense, and actually shows me that I've underpriced my
pulley. So, if you want it, take it now. The price goes up to $130 on
Friday.
Thank you, Geoffrey
-----Original Message-----
> From: Mark R DeLong [mailto:mdelong@nc.rr.com]
> Sent: Tuesday, July 17, 2007 8:28 PM
> To: Geoffrey
> Subject: Re: 4.2 crank pulley, E-Type, "double grooved"
>
> Thanks for the reply, Geoffrey. I found a new aluminum pulley from Classic
> Jaguar (http://www.classicjaguar.com/per9.jpg) for $95 plus shipping. I'd
> be willing to pay you $70 plus ground UPS. Let me know if that's OK, and I
> can Paypal or whatever.
>
> m
>
>> On Jul 17, 2007, at 1:00 PM, Geoffrey wrote:
>>
>> Hello Mark,
>> Yes, we have a pulley with two grooves. $100 plus shipping would do
>> it. Call if you'd like; tonight is best. Thank you, Geoffrey Reis at
>> Jag Connection.
>>
>> -----Original Message-----
>>> From: Mark R DeLong [mailto:mdelong@nc.rr.com]
>>> Sent: Saturday, July 14, 2007 9:04 PM
>>> To: geoffrey@jagconnection.com
>>> Subject: 4.2 crank pulley, E-Type, "double grooved"
>>>
>>> Marius from Marguar Jags said you might have some parts, he didn't
>>> have what I needed and forwarded me to you. Do you have a crankshaft
>>> pulley that fits the 4.2 dampner and has a double groove? I have an
>>> XJ6 (1979) pulley, but it's not the double grooved variety. I need it
>>> for an E-type.
>>>
>>> Thanks.
>>>
>>> m
|
Well, Geoffrey didn't get my business, but I do believe others can find a pulley from him for $130. Two weeks from now, it very likely will
cost more, so it would be good to hurry. Me? I'll be happy to get a pulley from Classic Jaguar, an item which is hardly phony and a good replacement for
something that is, after all, accurately reproduceable.
|
| | |
