
1963 Jaguar E-Type OTS
The story of a ground up restoration of a classic "XKE" Jaguar roadsterFetching and Dismantling (13 - 22 September 2002)
|
|
|
|
|
|
|
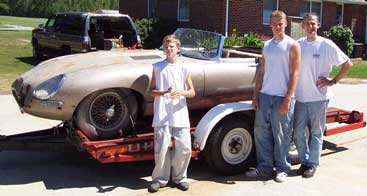
| We're off! (13 September 2002)
Wouldn't you know that this adventure in car restoration would begin on an auspicious day: Friday the Thirteenth. This follows
a revered tradition (well, perhaps it creates a tradition) in Jaguar restoration by transporting on auspicious days.
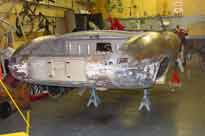
With a few pushes, some consultation and hammering, and a come-along borrowed from Mark O'Neill (the photographer of this family picture and former custodian of this Jag), we were on our way to Rougemont. Dismantling (14 - 22 September 2002) OK, just so you won't have to scroll down the page — here's what the old thing looks like after we pretty much took everything off of the monocoque body. The thing is virtually ready for sandblasting with just a couple of parts yet to be removed. (This was my goal for the week, and I took time off from work to do it. The boys, and especially Aaron, put in hard hours to make this dismantling happen as quickly as it did.)
The E-type learned lessons from its successful racing predecessor, The two concerns I had with this forty-year-old monocoque structure were
The front tubular steel was intact and in good shape, thank God. Those parts are not reparable, and the replacements are pricey.
I suspect that the repairs made to the car were largely cosmetic.
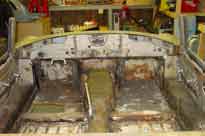
We removed the two seats. They were not attached to the floor, and they were not of the original Jaguar style for this model (and they might not even be Jaguar make at all). The front parts of both sides of the cockpit floors were carefully replaced with plywood. They had rusted out. However, when these were installed, the center steel reinforcements that follow the drive shaft tunnel were retained, so the structural integrity of the body was aided in some measure. These floor panels will need to be entirely replaced, from the front bulkhead to the rear bulkhead.
The rear of the body is actually in pretty good shape. Some minor dings and bumps have been bondo-ed up, but nothing appears particularly badly done.
I will need to replace both "fillets" (sections are the rounded corners of the back section of the cockpit, where the convertible top attaches). These
Overall, I am pleased with the state of the body. There is nothing that is particularly daunting at this point. I suppose that the repairs will be challenging, but they are well within our abilities. Mechanicals
I was told that the engine turned when I first began seriously looking at the car. We removed the engine from the bottom (contrary to the shop manual instructions which say remove from the top). We
had a bit of trouble with a pesky bolt holding the cylinder head, though we finally removed with with some crafty use of a high-speed drill and a
It may have been a while since I've taken apart an engine, but the gasket cement that was used on this engine seems a bit unorthodox. It looks like silicone glue or rubber cement. I'm used to something more substantial and gooey. We were able to remove the cylinder head without damaging the gasket, but we'll probably replace it with a new one anyway. I'm not worried about the transmission on the car. It came out. It looked OK. The Moss transmission had a reputation for being durable. I suppose that this one will be good.
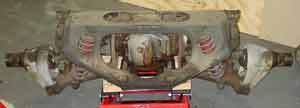
The independent rear suspension (IRS) came out well. Only the hand brake connection was feisty and we had to work around a big black spider until we
I don't foresee problems with the IRS either. We'll replace seals and bushings and such, and I believe it'll be good as new. Indispensible things We used a good amount of penetrating oil to loosen the bolts and nuts. In general, these were sprayed a few times, often with the applications spread across many hours. We had only a couple of bolts that we had to break or cut out, and we removed scores of bolts and nuts. A good digital camera sounds like a frill, but it will no doubt prove invaluable. Over the course of the first week we took about 200 photographs to document the way that things fit together and came apart in stages. Initially, the photography seemed a bit of a hassle, since we constantly had to retreat into the house to download photos. But looking at the photographic record after the dismantling reveals many of the details that will be important to building it all back up. We suspect that reinstalling the wiring harness (which we removed intact with some effort) will be eased by the photographic record. But that wiring is fearsomely complicated and it will be tough nonetheless. Decent tools are a must, of course. Our collection has been very adequate thus far. We have a pneumatic tool set, including impact wrench, air hammer, sandblaster, and curious blowing tools; a complete set of English measure wrenches and ratchet set; screwdrivers, chisels, and putty knives (great for paint removal); and hammers of various sizes and shapes (ball pein, regular old nail hammers, and a rubber mallet). A useful system to organize and store removed parts is an absolute must. — That and a very large store of Zip Lock bags (freezer size and sandwich size). I'll detail our parts organizing system later, when we put the entire thing on the web. Basically, the system I devised locates the part to a section of the car and records the approximate order of its removal. This should greatly increase the likelihood that we'll know what part goes where, and this will be especially more likely once we have the photographs organized in a similar fashion. Lots of space to store parts. A given. We stuffed bagged parts into my old chicken coop office, and a couple of boxes rest beneath the back workbench in the shop. It'll do. |
 The restoration of the "first" Jaguar E-type, known by its UK registration number
"HD9600," began on April Fool's Day 1999 (see Philip Porter's
The restoration of the "first" Jaguar E-type, known by its UK registration number
"HD9600," began on April Fool's Day 1999 (see Philip Porter's  the D-type, which won the Le Mans in the late fifties. That car was of tube construction. The E-type we are familiar with is partially tube construction
(the area in front of the "bulkhead" which begins in front of the dash) and partially structural sheet metal construction (everything else behind the dash).
This is an enormously strong construct.
the D-type, which won the Le Mans in the late fifties. That car was of tube construction. The E-type we are familiar with is partially tube construction
(the area in front of the "bulkhead" which begins in front of the dash) and partially structural sheet metal construction (everything else behind the dash).
This is an enormously strong construct.
 The outer sills got rusty, so they were replaced. The trouble was that the areas behind
the outer sills and internal to the sill structure overall were (probably) ignored. Because the inner sills lay behind coverings of the interior or
were less easily accessible, they were ignored. In short, the trouble is there, but it's harder to see and harder to repair.
Deterioration of the inner sills became apparent after we removed the interior trim — the carpeting (such as it was) and the felt padding.
Rust damage was especially bad in the front left foot well inner sill. It's not clear in my mind whether the entire inner sill on the left side will
need replacing. I am now thinking that it will not, though repair is required. The final verdict will be clear after sandblasting.
The outer sills got rusty, so they were replaced. The trouble was that the areas behind
the outer sills and internal to the sill structure overall were (probably) ignored. Because the inner sills lay behind coverings of the interior or
were less easily accessible, they were ignored. In short, the trouble is there, but it's harder to see and harder to repair.
Deterioration of the inner sills became apparent after we removed the interior trim — the carpeting (such as it was) and the felt padding.
Rust damage was especially bad in the front left foot well inner sill. It's not clear in my mind whether the entire inner sill on the left side will
need replacing. I am now thinking that it will not, though repair is required. The final verdict will be clear after sandblasting.
 were rusted through and repaired with bondo. We'll fashion a metal replacement, of course. Other rust damage in the rear was related to the deterioration of the sill:
the rear quarter panel on both sides were bondo-ed — perhaps the most shameful of the early repairs, since the bondo hides a multitude of
sins. The areas immediately behind that bondo were in bad need to replacement. We will tear that bondo out (as we will do with all the bondo) and
probably open up the rear quarter panel in that section. This will allow us to replace the internal structure.
were rusted through and repaired with bondo. We'll fashion a metal replacement, of course. Other rust damage in the rear was related to the deterioration of the sill:
the rear quarter panel on both sides were bondo-ed — perhaps the most shameful of the early repairs, since the bondo hides a multitude of
sins. The areas immediately behind that bondo were in bad need to replacement. We will tear that bondo out (as we will do with all the bondo) and
probably open up the rear quarter panel in that section. This will allow us to replace the internal structure.
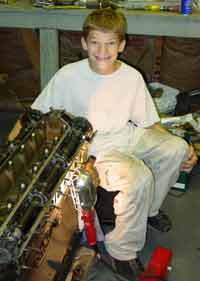 cutter. We had trouble loosening the top two timing chain spockets, but we circumvented that by removing the cam shafts. The cam shafts look quite good, and their bearings look practically new.
The valves show some normal wear and tear, but none is compromised with a blow hole. Pistons are blackened, but everything moves nicely in the cylinders. We haven't
removed the oil pan to look at the connecting rods and the crank shaft.
cutter. We had trouble loosening the top two timing chain spockets, but we circumvented that by removing the cam shafts. The cam shafts look quite good, and their bearings look practically new.
The valves show some normal wear and tear, but none is compromised with a blow hole. Pistons are blackened, but everything moves nicely in the cylinders. We haven't
removed the oil pan to look at the connecting rods and the crank shaft.
 could wrestle enough room to remove it. (This was one of two big black spiders we ran into.) It dropped like a charm. Read the shop manual instructions carefully to get the details on easy removal.