c h r o n o l o g i c a l
g u i d e
> Year 1 Year 2 <
> Year 3 Year 4 <
> Year 5 Year 6 <
> Year 7 Year 8 <
> Year 9 Year 12 <
fetching & dismantling
sandblasting & evil rust
right "b" pillar
fixing right inner sill
basic body repair, por-15
frame removed, footwell repair
hole fixed, car flipped, etc.
sill stiffeners, rear bulkhead, etc.
various small parts
left sill, added stiffener, etc.
- lousy weather
trunk floor (reprise)
right floor, left sill, etc.
left floor, wheel well, etc.
right upper wishbone
floor done, car righted
rack, front frame, evil rust
left door cleaned & fitted
right door, right suspension
bonnet, part 1
bonnet, part 2
bonnet, part 3
bonnet, part 4
bonnet, part 5, etc.
bonnet, part 6
bonnet, outer sill, etc.
lots of stuff
left side, bonnet internals
frame, bonnet attached
engine stand, oil pan removal
pistons removed, sanding
sanding, final filling
color, frames, primer
brushed primer test
2nd coat primer
holiday greetings!
finish prep, detail on dent fix
spraying primer
winter chores
1. undercoat, plating prep
2. plating, spraying color
bonnet, plate prep, cylinder head
cylinder head paint, bushes
plating saga
front frame, suspension, part 1
front suspension, part 2
front suspension, part 3
priming and painting
bonnet, part 7
painting color!
boot lid, steering wheel
gas tank
winter chores
1. firewall sundry
2. front suspension
3. steering setup
4. master cylinders/pedals
5. the rest
data plate screed
winter to spring
1. irs rebuild
2. trunk floor, harness
3. data plate (again)
data plate, door, headlights
dash vinyl, crosshatch aluminum
windshield, right door
interior, "widget"
chrome parts!
door handle details
rolling chassis
molasses rust removal
electrical, part 1
bores, thrust washers
new engine!
head differences
block differences
compression ratio
engine in place!
alternator
catchup & photos
it runs!
setback and brakes
darned close & engine diffs
driven
top and seats
driving and little stuff
|
|
|
Bores and thrust washer damage
I've been picking away at the engine. The cylinder head has gotten a clean bill-of-health after inspection, pressure testing, and a shave. The SU carburetors are cleaned up,
though not quite ready since replacement parts are needed. Bores are all measured, and they have little wear from the last rebuild, when .030-upsized pistons were installed.
I have debated whether I should just go ahead and have new sleeves fitted and go back to the nominal bore of 3.4252". Since the current bores are still in good shape, I think I'll
wait to do the more thorough rebuild. I'll fit new rings on the old pistons.
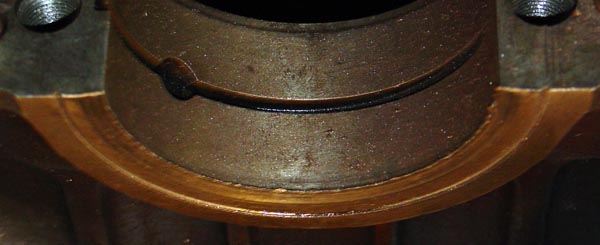
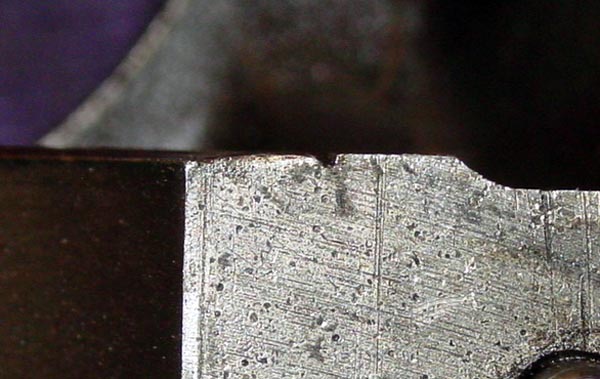
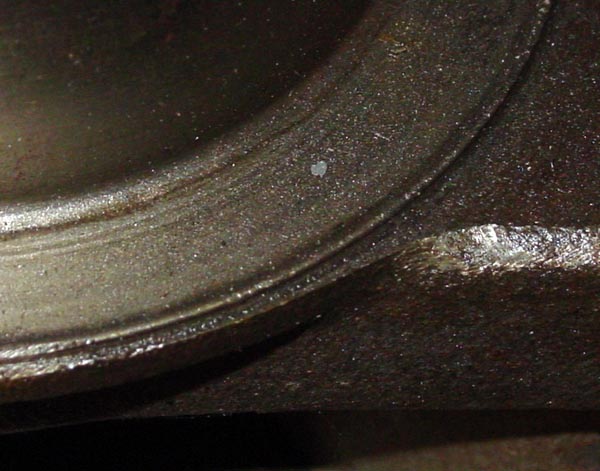
But there are still issues that trouble this engine work. Back when Aaron and I took the engine apart, we discovered the thrust washers unseated, with one of them sloshing around
the oil pan. Their absence took its toll on the crankshaft and a part of the engine block. Pictures below tell the story. The crankshaft might be repairable, assuming that a
good submerged weld could build up the face where the thrust washer fits. A ring-like ridge stands up about 0.045" from the face where the thrust washer fits. I
believe that entire depression would need building up. The ridge itself bit into the engine block in the absence of the thrust washer, and the are where the crankshaft met
the block has been beveled slightly. That area would also need squaring up.
Obviously, the question in my mind now is whether the crankshaft is salvagable — or, for that matter, the block. Mouseover the picture to see explanatory text.
|
| | |
