|
The block — 1963 E-type v. 1979 XJ6
You know you're not in 1963 anymore when you see that drain swirl logo of British Leyland in relief on the block.
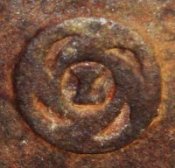 It's enough to make you think twice about your angle grinder and whether you're enough of an artist to rub off the metal smudge. Of course, in October 1978,
when this new engine of mine was cast, British Leyland
— or "BL" — was the colossus astride nearly all of British automobile manufacture. At that time,
It's enough to make you think twice about your angle grinder and whether you're enough of an artist to rub off the metal smudge. Of course, in October 1978,
when this new engine of mine was cast, British Leyland
— or "BL" — was the colossus astride nearly all of British automobile manufacture. At that time,
 Jaguar has been in the BL fold for a decade, and the conglomerate included nearly all of Britain's formerly independent marques:
Jaguar, Daimler, Lanchester, Mini, Riley, MG, Morris, Wolseley, Austin, Vanden Plas, Rover, Land Rover, Alvis, Standard, and Triumph. In
the early 1980s, BL's long-troubled history led to its unravelling. Jaguar was spun off and became independent
with a stock offering in 1984. The remnants of British Leyland changed its name in 1986 to "Rover Group," which of course has had its own
history of disintegration. (At least it now is much more international, I guess, since BMW bought Rover and
perhaps thought better of it.
MG Rover is now Chinese rather than British.)
Jaguar has been in the BL fold for a decade, and the conglomerate included nearly all of Britain's formerly independent marques:
Jaguar, Daimler, Lanchester, Mini, Riley, MG, Morris, Wolseley, Austin, Vanden Plas, Rover, Land Rover, Alvis, Standard, and Triumph. In
the early 1980s, BL's long-troubled history led to its unravelling. Jaguar was spun off and became independent
with a stock offering in 1984. The remnants of British Leyland changed its name in 1986 to "Rover Group," which of course has had its own
history of disintegration. (At least it now is much more international, I guess, since BMW bought Rover and
perhaps thought better of it.
MG Rover is now Chinese rather than British.)
It hardly needs mentioning that Ford took up Jaguar eventually, spent a lot of money, and now appears to be setting the company up
for the vacuum cleaners of
private-equity investors.
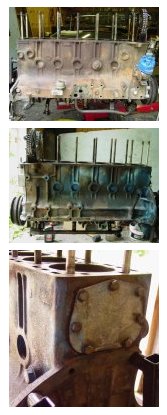
At any rate, the logo of liquid(ity) going down the drain is on the right side of this engine block. However, the familiar "JAGUAR 4.2 LITRE" marks
sit more centrally and more prominently smack in the middle on that side. That label is where it should be and where its like had been all along.
The left side has as its distinguishing characteristic the oil dipstick fitting. That feature is so undistinguished that I haven't spent the time
worrying whether it is the same as the 3.8, though I believe it will be prudent to use the XJ6 dipstick at first, just to make sure that the oil levels are
correctly measured.
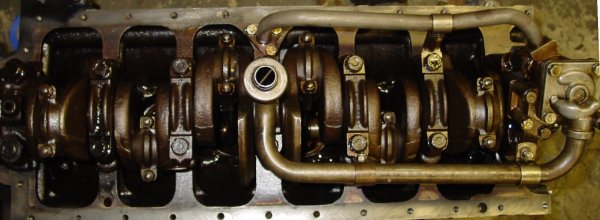
Differences of timing covers and water pump impellers
I was told that the timing cover was a drop in, but I was actually hoping that the water pump was instead. There are differences, beginning in 1969,
of the capacity of the pump's innards and the size of the water pump impeller. Also, the semicircular cutout for the crankshaft end was a bit wider — oddly, I thought. We actually
checked the crank for signs of wear and checked for free play. But the more glaring difference was the water pump void.
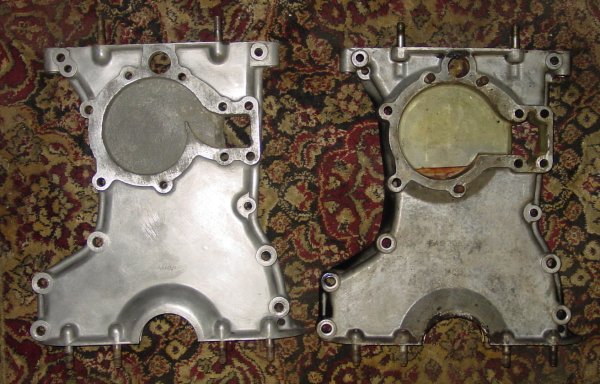
Now that the 1963 version of the timing chain cover and water pump are fitted, I do have to admit that the newer design looks better engineered, with
probably higher water throughput. I chose the original
because I feared that the forward extension of the XJ6 water pump was too much. The later water pump is bigger overall, and the belting for the XJ6 is more
complicated, but there isn't all that much space between the front of the engine and the back of the "picture frame."
Differences of oil pan and sump plumbing
The XJ6 oil pan is significantly different from the E-type's. It has a blubous protrusion that extends off-center toward the right. The oil intake from the sump
comes up near the rear on the XJ6, while on the E-type, the sump intake is centrally located. I wanted to keep the XJ6 sump, actually, but I was concerned
about clearance in the subframes. I asked a couple of people about the fit, and Dick Maury let me know about the fit problem of oil pan and the sump intake,
and he let me know of some of the adjustments that come with the changes on the oil filter mount. He has been around the block (and through some slalom courses)
with his Jaguar cars, including a modified 1971 E-type.
The E-type sump intake pipe is quite a bit shorter than the one on the 1979 XJ6, which pulls oil from the large deep collector at the rear of the oil pan.
But interchange is easy, since there is only one pipe to worry about, and it's the same diameter for the E-type and the XJ6. The oil pump on the 4.2 liter
engine is said to be better — larger capacity or better efficiency, I believe — but that makes no difference as far as pipe sizes. Bill McKenna's
very correct restoration of his 1963 E-type coupe included a 4.2 liter oil pump —
one of the very few deviations from the 3.8 liter setup he did. Bill commented in his report that he had to make some changes to the "oil pickup pipe,"
though I didn't have to make any changes.
It's literally a five-minute job to replace the long pipe for the shorter E-type pipe. The original 3.8 liter oil pan is a drop-in fit on the 4.2 liter
block and will fit in the car with the original oil pan, though it might not with the XJ6 pan. (An aside: I probably would have stayed with the XJ6 pan if I could, because
it seemed to me to have larger capacity and the oil uptake looks to me to be a bit better thought through. It is, of course, a quite noticable deviation
from the 3.8 liter oil pan design.)
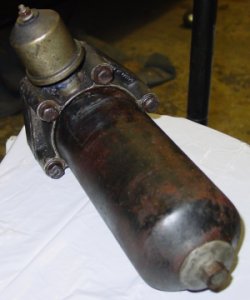
Oil filter mount differences
The oil filters change much for the better between 1963 and 1979. The old felt filter replacements gave way to nice and easy spin-on filters. The
oil filter mount on the 1979 engine is ready to accept a regular modern filter.
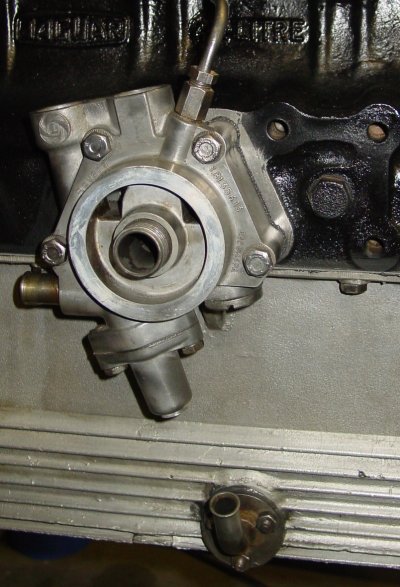
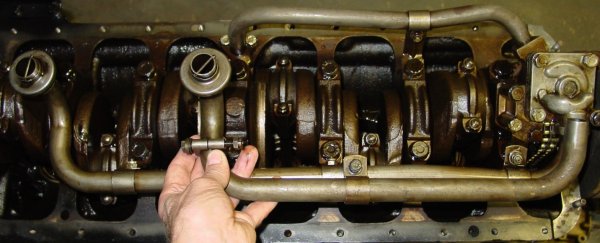
And beyond the simple change to spin-on filter mounting bracket come, of course, the complications. On the 3.8 liter engine, the hose to the oil pan comes right off the bottom
of the oil filter bracket, and so the hose run on the old engine is straightforward — though (as many have noted) it's complicated by different outer dimension pipes
fitting to each hose end. On the 1979 XJ6, the rubber hose is only an inch or two, connecting to a pipe running to the bulge in the pan that caused me
the worry about fit into the subframes, since it extends fairly far to the right. On the XJ6, this pipe heads to the rear, and so the fitting on the oil filter
 bracket heads toward the rear. The upshot is that the run from the bracket to the oil pan pipe mount is a little contorted when you use the E-type oil pan and the
XJ6 oil filter mount. Surely it's not a straight shot. Dick Maury told me that he used an XJ6 engine in his race car, and he took advantage of the hose changes
to fit an oil cooler. It's a tempting thought, but I don't think I want to add a complication at this point.
bracket heads toward the rear. The upshot is that the run from the bracket to the oil pan pipe mount is a little contorted when you use the E-type oil pan and the
XJ6 oil filter mount. Surely it's not a straight shot. Dick Maury told me that he used an XJ6 engine in his race car, and he took advantage of the hose changes
to fit an oil cooler. It's a tempting thought, but I don't think I want to add a complication at this point.
On the old oil filter mount setup, the oil pressure sensor comes off the top, and on the XJ6 the sensor is on a separate aluminum block mounted to the rear of
the oil filter mounting bracket.
The XJ6 oil filter mount has the connection for the cam oil feeds as well. It is on top of the mount. Dick said that it is possible to add the connection
in the regular E-type location (on the lower rear left side of the block) by drilling and tapping a hole, but this XJ6 setup suited me just fine. The XJ6 block casting,
by the way, is flat where the cam oil feed oil would go, so this would be a small alteration for a machine shop to accomplish.
The 4.2 liter block has some mounting differences, though the block itself was designed as a replacement option for earlier XK engines, too. So there is (mostly)
backward compatibility for earlier setups, sometimes slightly ingenious ones.
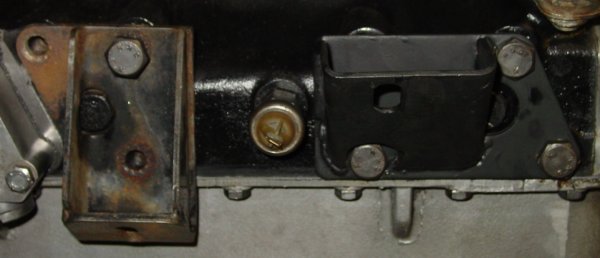
Motor and other mounts
Just forward from the oil filter mount there is a significant change from the old E-type setup. The motor mounts on the XJ6 are set farther back — more or less
centrally on thge block. But, this is no big deal, because the tapped holes for the old E-type motor mounts were retained on the XJ6 and used for other purposes
like the power steering pump and air conditioning compressor (I believe).
It's really just a matter of putting the E-type motor mounts in their correct place. — A straight and simple bolt-in job. (I've never Ebayed a thing in my
life, but I might give it a whirl with these excess XJ6 parts I've got.)
However, when you jump from the old 3.8 to the newer 4.2 liter, you pretty much have to say goodbye to your generator, not that you probably wouldn't mind that
in any case. The generator bracket holes are completely missing on the 4.2 liter block. On the 3.8 liter block, these holes are placed just above the motor
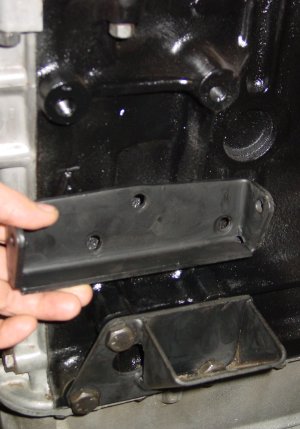 mount holes. On the 4.2 liter engine, the alternator mounting bracket fits much higher on the block. (See photograph on the left for what the 4.2 liter block holes look like.)
I've learned from a few telephone calls and emails that the 4.2 liter E-type alternator mounting bracket is pretty rare, unless you're willing to use a
bracket for cars with air conditioning. There are two part numbers for the bracket, C25158 for the Series I and C30615 for the Series II (both for non-air-conditioned
cars). I called one fellow who deals with Jaguar salvaged parts, and he told me that he didn't have any but that the brackets are available from the Usual Suspects.
Then he then laughed and said, "But I bet you were trying to avoid having to use junk."
Oh, well. I guess I might have to use junk — pricey junk at that. Or, I'll get the part and make a non-junky replacement myself and Ebay the replacement
with the excess XJ6 parts. It really depends on whether the new part I need turns out to be of lower quality than I want, I guess. The issue of part quality
has been coming up quite frequently on restoration forums, and not just the forums devoted to the Jaguar marque.
The alternator upgrade (or at least "changeover") has been well documented. It involves
changing the ground from positive to negative, as documented on Classic Jaguar's website.
You don't have to stick with a Lucas alternator, which is a blessing, I think. AC Delco alternators have been used (and it seems to me that Classic Jaguar has offered
an upgrade kit using an AC Delco unit). Ray Livingston has described a way of using a Hitachi pickup truck alternator for an upgrade of the 3.8 liter setup. This
requires a special bracket available from XKs Unlimited (part number 08-0399 in their 2005 catalogue, p. 316). But the same processes would work for installing
a Hitachi on a 4.2 liter engine, using a standard alternator bracket.
Ray's documentation is available from XKE-Lovers (PDF).
Speaking of mounts, I got my parts from Terry's Jaguar Parts, and I got new motor mounts, a bushing for the upper
engine mount, radiator mount bushes, and a new fuel sump gasket from Motorcars, Ltd.. The engine
of course, is practically ready to have the transmission mounted, so this restoration jounral entry is still behind the curve, so to speak. I'll trade timeliness for
some thoroughness. And there are some issues still to be dealt with — adaptations for the old (nicer) value covers, the crankshaft pulley, and of course, the
alternator. So, there are still things to square up before this one runs.
|
