
1963 Jaguar E-Type OTS
The story of a ground up restoration of a classic "XKE" Jaguar roadsterSandblasting and Evil Rust (29 September - 2 October 2002)
|
|
|
|
|
|
|
| Sand Play (29 September 2002)
We were quite industrious the first week, and we stripped most of the "tub" (the name given to the basic body stripped down to essentials). We used aircraft stripper, old wood chisels, putty knives, and rough scrubbie pads. Because rust reappeared in several areas overnight, I used some WD-40 (you can do practically anything with it!) to seal the metal from the air. That did the trick, though we will have to be sure to degrease the surface before painting. A bit of paint remover is just fine, but it leaves paint residues in lots of tough-to-get-at places. So we'll be using a sandblaster to get rid of the paint and coatings in those areas. A sandblaster also preps the metal for the sealant I've chosen (see "A Little on Rust Protection" below), and cleans everything right down to bare metal. Sandblasting is really dirty work. As a matter of fact, you haven't felt grime, 'til you've blasted some sand around. Sand gets everywhere: your hair gets encrusted to the roots and your underwear proves to be more permeable than you'd think. A shower never felt so good as after a sandblasting session.
We found sandblasting "media" at the local Home Depot, though it seems to be little more than what you get with "Play Sand" at your lumber yard.
So, for large areas without too radical curves or angles, we fell back to using a disk sander with 60 grit sandpaper. It cut through the residues nicely. For areas that were more curved, I restripped them, using a tough 3M scrubber after the paint was mostly scraped with chisels. With a final application of aircraft stripper and a couple of wipes with the rough scrubbie, the metal was pretty clean. We sanded those areas as well after they had dried. The sandblaster worked very well in less accessible areas. Sandblasting and finish removal reveals all of the areas of hidden rust and ancient repairs. For the most part, we had already identified areas requiring repair and had figured out what would need to be done. However, paint removal from under the rear tail section showed some unexpected rust below the gas tank and along a couple of the stiffeners inside the "boot" (British English for trunk). About a quarter of that section of the body skin will have to be cut out and replaced. Fortunately, it won't require any fancy manufacture: it's pretty much flat metal. By Sunday evening, the rear section of the body — roughly from the rear cockpit bulkhead to the taillights — had been primed with rust preventative paint, except for the areas that would be removed and replaced with metal. This primed area will require another coat of preventative primer (after wet sanding) before we will be able to concentrate on the finish. But, then, finishing is still a long way off, so we won't need to dread wet sanding in the near future! Evil Rust (1-2 October 2002) We managed to cut out an area at the base of the "B" post on the right side of the body. This area is where the door striker is located. The E-Type is pretty much built around its doors, and so this area is of critical importance to get the body straight. Thus far, this Jag is pretty straight, despite its age and disabilities with rust. However, the "B" post on this side was showing some deep rot, which was visible through one of the structural holes in the body after we had removed the interior parts covering the body sides and the rear bulkhead. This area is also atop the rear portion of the outer sill that I had already written off. It was not surprising that the section had deteriorated. (The picture shows this section from the outside of the body. We also cut away a portion of the badly rusted rear "stiffener" so that we could see the damage behind it. It is as bad as it looks, too.)
Elements of the "B" post here, the "stiffener" inside the sill structure, and the lower section of the inner sill will need either removal and repair or replacement.
Fortunately, all of these parts are available (such as the entire "B" post structure) or they are easily fabricated (such as the read bulkhead center section). We removed the right side door to get better access. A next step will be to shore up the "B" post with reinforcement pieces installed for the duration of the body rebuild. I'm thinking it might be good to repair this section of the body first and then move to the inner sill. A Little on Rust Protection Search the web for car restoration web sites, and you'll get a whole bunch. The pages will often be devoted to rust removal, rust repair, and rust protection. This is the common theme: your car will end up as a pile of iron oxide unless you do something. Unfortunately, the E-Type is a victim of its own success when it comes to rust. So-called "restorers" scoop up the cars, slap some bondo on them, spruce them up for a good show, and sell them. They're interested in the sale, not the car, and so the underlying rot lurking in the the most obvious places ends up obscured by fibreglass and a cheap paint job. The car is weakened and soon headed for the scrap pile. That scenario needn't always be repeated, and for this car, it won't be. I don't intend to sell it, for one. I plan to drive it regularly. And, above all that, it just seems right to repair the rust and boo-boos as well as we can. Of all of the rust treatments I researched, a product called POR-15 got good reviews. I ordered samples of the product and was impressed enough that I've decided to coat the entire car (wherever possible) with the stuff. It isn't exactly easy to work with, though it does coat nicely even with a brush. You do have to think about things like surface preparation and even the timing of your paint job — topcoats of POR-15 products need to be done when the POR-15 primer product is as a certain point in the curing process. The end product is comparable to "powder coating": it's tough, it's (probably) very durable, it looks good and stays that way. The POR-15 primer itself is available in colors (grey, black, silver) and in clear, but the manufacturer doesn't recommend using POR-15 primer in places exposed to sunlight. The product discolors if exposed to UV light, so you have to use a top coating. Uh, it ain't cheap, either. But when you figure the math out, you see that spending some money on coatings wlll prevent expensive rust repairs in the future. I like doing the restoration, but I'd like a child or grandchild to do the next restoration of this Jaguar! |
 (Play Sand is the stuff suburbanites use to fill their kids' molded plastic sandboxes.) Play Sand might be a little less fastidiously dried and screened,
but it's pretty similar to regular old blasting sand. Overall the sandblasting was most successful with parts that you could easily handle, such as
fittings and small pipes that were taken from the frame. The blasting was less efficient on the body itself, even though the body paint was fairly removable.
There was simply so much acreage to blast!
(Play Sand is the stuff suburbanites use to fill their kids' molded plastic sandboxes.) Play Sand might be a little less fastidiously dried and screened,
but it's pretty similar to regular old blasting sand. Overall the sandblasting was most successful with parts that you could easily handle, such as
fittings and small pipes that were taken from the frame. The blasting was less efficient on the body itself, even though the body paint was fairly removable.
There was simply so much acreage to blast!
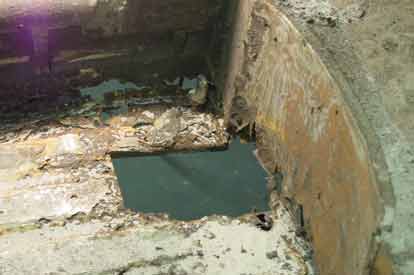 The lower section of the rear bulkhead — the section immediately behind the right side seat — also need replacing. This section apparently was under some
significant corrosion pressure, since a stabilizing bar from the rear suspension was the only part the we actually had to cut out because of rust fusing the bolts
to the body. The picture below shows this section of the interior, with the rear bulkhead plainly visible and the rear portion of the inner sill showing some
significant corrosion. The rectangular hole in the floor panel was cut out to remove the rear suspension.
The lower section of the rear bulkhead — the section immediately behind the right side seat — also need replacing. This section apparently was under some
significant corrosion pressure, since a stabilizing bar from the rear suspension was the only part the we actually had to cut out because of rust fusing the bolts
to the body. The picture below shows this section of the interior, with the rear bulkhead plainly visible and the rear portion of the inner sill showing some
significant corrosion. The rectangular hole in the floor panel was cut out to remove the rear suspension.