c h r o n o l o g i c a l
g u i d e
> Year 1 Year 2 <
> Year 3 Year 4 <
> Year 5 Year 6 <
> Year 7 Year 8 <
> Year 9 Year 12 <
fetching & dismantling
sandblasting & evil rust
right "b" pillar
fixing right inner sill
basic body repair, por-15
frame removed, footwell repair
hole fixed, car flipped, etc.
sill stiffeners, rear bulkhead, etc.
various small parts
left sill, added stiffener, etc.
- lousy weather
trunk floor (reprise)
right floor, left sill, etc.
left floor, wheel well, etc.
right upper wishbone
floor done, car righted
rack, front frame, evil rust
left door cleaned & fitted
right door, right suspension
bonnet, part 1
bonnet, part 2
bonnet, part 3
bonnet, part 4
bonnet, part 5, etc.
bonnet, part 6
bonnet, outer sill, etc.
lots of stuff
left side, bonnet internals
frame, bonnet attached
engine stand, oil pan removal
pistons removed, sanding
sanding, final filling
color, frames, primer
brushed primer test
2nd coat primer
holiday greetings!
finish prep, detail on dent fix
spraying primer
winter chores
1. undercoat, plating prep
2. plating, spraying color
bonnet, plate prep, cylinder head
cylinder head paint, bushes
plating saga
front frame, suspension, part 1
front suspension, part 2
front suspension, part 3
priming and painting
bonnet, part 7
painting color!
boot lid, steering wheel
gas tank
winter chores
1. firewall sundry
2. front suspension
3. steering setup
4. master cylinders/pedals
5. the rest
data plate screed
winter to spring
1. irs rebuild
2. trunk floor, harness
3. data plate (again)
data plate, door, headlights
dash vinyl, crosshatch aluminum
windshield, right door
interior, "widget"
chrome parts!
door handle details
rolling chassis
molasses rust removal
electrical, part 1
bores, thrust washers
new engine!
head differences
block differences
compression ratio
engine in place!
alternator
catchup & photos
it runs!
setback and brakes
darned close & engine diffs
driven
top and seats
driving and little stuff
|
|
|
Bonnet Test Fit
The garage had a very special visitor over this weekend. My dad, Wallace DeLong, came up to North Carolina after making the rounds
 through Florida to see relatives and participate in a travel exchange with people in Sarasota. I was a little worried about suggesting
that we take on a project with the old car, since I didn't want to impose my restoration work on an unwilling participant, but it
actually turned out that Dad wanted to do exactly that.
through Florida to see relatives and participate in a travel exchange with people in Sarasota. I was a little worried about suggesting
that we take on a project with the old car, since I didn't want to impose my restoration work on an unwilling participant, but it
actually turned out that Dad wanted to do exactly that.
As I mentioned before, Stefan Roundy provided a fine replacement for the bent bonnet subframe. That piece, along with the replacement
left subframe from Bill McKenna, meant that the front frame could be put together with sound pieces. The bent up bonnet frame meant
that the bonnet itself hung badly, and I was anxious to see whether the new bonnet subframe would straighten out the bonnet fit.
So, Dad and I installed the front subframes and mounted the bonnet on its hinges.
It fit squarely off the front bulkhead (firewall), though the bonnet measured just shy of an inch forward of the bulkhead — a bit
too wide a space. We figured we needed to get the space to about a third of that.
We made some makeshift shims to insert into the hinges at the top. Basically, to bring the bonnet back, we had to make sure that the
hinges were tightened until the hinge touched the area on the lower valance where they fit. No shims there — we needed to get the
bonnet back as far as possible. Shims at that point would move the bonnet forward. Once we had done that, checked to see how the
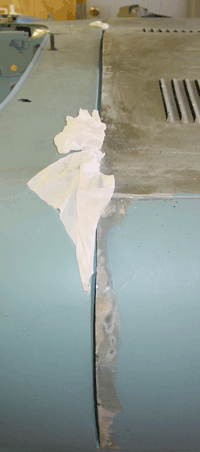 bonnet fit against the lower sections of the bulkhead and the upper sections. Things were slightly wider at the upper part than at the
lower, meaning that we could raise the bonnet to even things out.
bonnet fit against the lower sections of the bulkhead and the upper sections. Things were slightly wider at the upper part than at the
lower, meaning that we could raise the bonnet to even things out.
We did the raising in two ways: we raised the bonnet subframe by inserting a small shim between the subframe and the "picture frame"
at the lower connections. And we placed shims over the top section of the bonnet hinge that pivots on the subframe. These two things
did the trick. I do not think both will be necessary when we actually fit the bonnet after the suspension is in place, since the dynamics
of the frame will change, and the bonnet subframe will probably sit slightly higher as a result. Roger Los mentioned that his bonnet
fitting was simplified after installing the suspension pieces that fit into the picture frame. When I first read that, I felt it
might be a little dubious, but seeing how the structure fits and acts when bolted down, it is very probable that the rigidity of those
pieces will support the frame in the right places, with the result that shimming will be less of an issue. I think we'll still need to
shim upward, though.
The final gap between the rear of the bonnet and the front bulkhead ended up being about 3/8 inch -- about a half centimeter, a little
wider perhaps. I'm reluctant to go much narrower than this, simply because the thickness of the primer and paint will make things a little
tighter. The gap is about right. It is amazing to see what a new bonnet subframe will do to the gap, at any rate. When we first mounted the
bonnet back in August of last year, the gap was a crooked disaster.
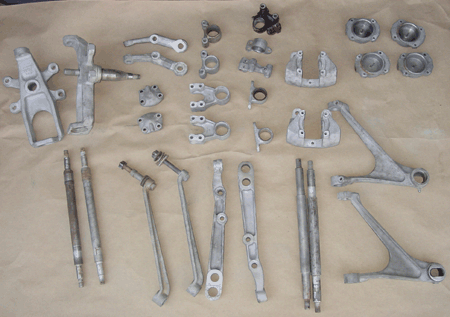
Front Suspension Parts for Plating
Although I didn't subject my dad to the gritty glories of sandblasting, we did weigh and organize the front suspension pieces that are
due for nickel plating. There is still one suspension fitting that needs disassembly and cleaning. It has resisted my efforts to extract some
pretty rusty bolts. It's soaking in penetrating fluid now. We have 64 pounds (about 30 kilograms) of metal to be plated. I've decided not
to send off small parts like washers and nuts. These I will probably plate myself, as I'm leaning toward ordering a nickel plating kit from
Caswell Plating. Bill McKenna says it's actually less putzy than zinc plating, and that seemed simple enough.
The platers is located in Fayetteville, North Carolina, and UPS wanted almost $90 USD to ship the parts. I figure that the trip will be a
pleasant drive, and I should know what the charge will be without having to spend $180 USD on shipping, roundtrip.
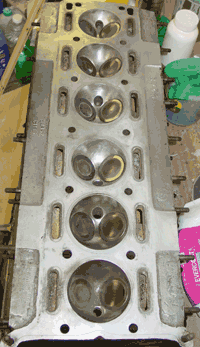
Cylinder Head Cleanup
The final thing we did was clean up the insides of the cylinders where the valves are located. Five of the six chambers had a good deal
of grime in them, and the remaining one (number one) was not too bad — which made me suspicious. I think that the fuel mix was
set rich, probably to avoid pinging? Wire brush attachments to the drill made quick work of the grime. The valves were obviously in good shape,
and my dad and I wondered if the valves were recently replaced in an overhaul. Dad looked pretty closely at cylinder wear and the valves
and felt that the last overhaul wasn't that long ago, and the engine didn't require a massive amount of work. We did not look closely at
the crankshaft (most of which is still in place), and there is a high probability (in my mind at least) that the rebuild of the engine
was focused on the top, and not the bottom. Even though the bearings for the piston rods weren't bad, the keys in my mind are the crankshaft
bearings. After all, it's fairly easy to replace rod bearings, but to replace the crankshaft bearing you have to remove the crankshaft.
Wear related to that is heavier on this engine, so I'm suspicious. When we get to the engine in earnest, the crankshaft comes off and the
measuring begins.
Here's what the chambers looked like after some cleaning:
|
|
|
