
1963 Jaguar E-Type OTS
The story of a ground up restoration of a classic "XKE" Jaguar roadsterRight "B"-Pillar (5 - 6 October 2002)
|
|
|
|
|
|
|
| Right "B"-Pillar (5 - 6 October 2002)
The "B"-pillar is where the door striker is located, and the right-de "B"-pillar on this care had some rust damage that was cosmetically repaired, although
not as badly repaired as the inner sill. The original fix did nothing to the internal corrosion, but the plates that were added to
We removed the bondo and cut out the reinforcement plate, which seemed to be small gauge sheet metal (though perhaps not the 26-gauge that we've seen elsewhere on the vehicle). Then we cut out the area that was apparently replaced before — well, not exactly replaced ... more like just slapped on and welded into place.
The piece that was cut out was in places three thicknesses deep, probably because of a tab that was initially in the "B"-pillar assembly. The process
of replacement was quite straightforward. We spotwelded tabs into place at the perimeter of the hole. This was of 16-gauge steel (tough to bend but nice for welding).
Then we bondo-ed — that is, we used bondo as it was meant to be used. It might be of some historical note that I was interested in learning how to "lead-load" (or is it "to load lead"?), and I visited the discussion area on Classic Jaguar's very fine web site (http://www.classicjaguar.com/) to pose a question. How does one really load lead? The answer was that lead loading is a practiced art and you might as well use bondo, since it doesn't deter from a restoration if it's used as it should be. That is, sparingly. However, for those who really want to learn the dark arts of lead loading, there is apparently a kit that'll help. One thing about lead loading is that you've got to get it right from the first. Unlike bondo, you can't just decide to add some lead to an area. The whole thing needs to be reapplied. And from what I learned from the forum, the area where you want to load the lead has to be exquisitely clean. Don't try to do this with acid flux solder. Lead loading, by the way, was the common practice in the era when the E-Type Jaguars were produced. When you remove the paint and primer from the body, you can easily see where the lead was used. Basically, it obscured the seams of the quarterpanels and the sills. The joke was that Jaguar used an awful lot of lead to get the panels to fit together nicely. Things were not, shall we say, exactly manufactured for the E-Type. But then, I've heard the same thing said of the Ford Mustang of the era. The picture of the "completed" repair, by the way, was taken after a layer of POR-15 was applied (see the entry for 3 November 2002). This is actually good, since it shows that there are still some imperfections in the bondo application. You can easily see where the weld line was done (it's a lump on the bondo). The final repair will require sanding this surface and (perhaps) adding a layer of bondo to minimize the lump-effect. |
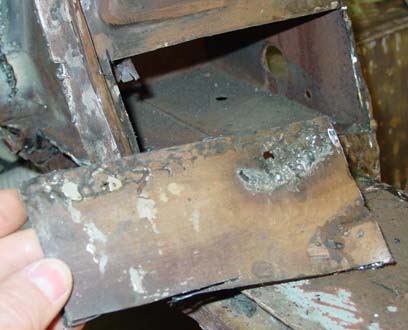 the outside of the "B"-pillar actually had some structural impact. Unfortunately, the way to obscure the fix was to apply bondo, and so the structural
repair was apparent in a large lump of bondo about five centimeters from the base of the pillar, just under the door striker.
the outside of the "B"-pillar actually had some structural impact. Unfortunately, the way to obscure the fix was to apply bondo, and so the structural
repair was apparent in a large lump of bondo about five centimeters from the base of the pillar, just under the door striker.
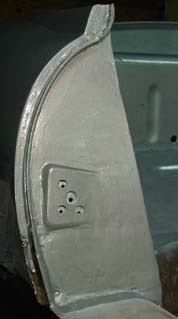 Then we measured the hole carefully, cut it out, and welded it into place. The tabs themselves were spot welded, and then along the perimeter we used a
regular old butt weld.
Then we measured the hole carefully, cut it out, and welded it into place. The tabs themselves were spot welded, and then along the perimeter we used a
regular old butt weld.