The alteration of the timing chain cover water inlet seems to have done the trick. The old thing has retained coolant where it should, and
we've run the car many times without the horrible froth of contamination surfacing beneath the valve covers. Finally, we have a moving and well running car!
Aaron took it out on a maiden voyage in the middle of a cold day, so the earmuffs felt good, I'm sure. This has been a cold and wet winter, and I'm afraid
the yard has taken a beating (not to mention that there's all sorts of crap out back by the garage and shed, now preserved for posterity on YouTube).
We have fastidiously checked and rechecked the oil to see if any wiff of water is leaking through, but so far there's not been any coolant. We've run
the car fairly frequently since, and I have been incrementally working up the electrics and getting it to the point where a car safety inspector could smile
and hand me a sticker. Since the car predates emissions inspections — and perhaps any North Carolina inspection at all — I don't expect trouble.
Home-made solid state 10-volt regulator
The water temperature, fuel level and (perhaps?) oil pressure gauges use 10 volts, not 12-or-so volts. Smiths did this in order to keep the gauges fairly accurate
— or at least try. My regulator was shot, and it was interesting to do the research on the device. In effect, the old fashioned regulator was an electro-mechanical
device. It basically created a quick oscillation of 12-volt power to approximate 10 volt steady power. I didn't bother to do a post mortem on my old Smiths
regulator, but I would guess that it was hopelessly corroded or seized.
I could have bought a solid-state replacement from CoolCat (here).
However, Doug Lawson has put together some instructions on making your own replacement of the Smiths voltage regulator
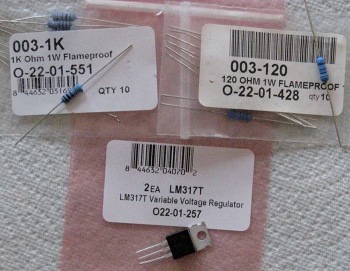
(PDF). The parts are easily acquired, and I figured it was worth doing something ingenious.
I got the resistors and the LM317T chip from Parts Express, and I think shipping ended up costing more than the components. For the case, I used a housing from a discarded
horn relay. It was actually too big, but I had it on hand, and I wasn't planning on putting it where the original Smiths unit went so it wasn't going to get in the way. Twenty minutes
of soldering and a little fuddling around was all it took.
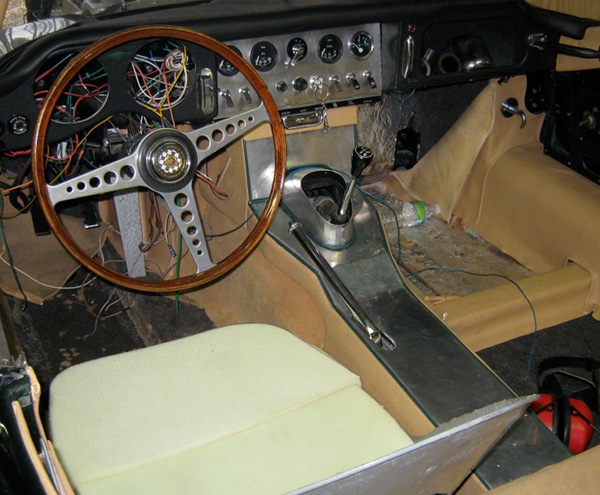
I ended up fitting the revised regulator behind the glove box. It works quite nicely, it seems. Lord knows if the gauges are actually true (I think not), but they are probably
close enough. I have not yet hooked up the oil pressure gauge for the interior, since I have a mechanical gauge in the engine compartment that is easy to see when working
under the hood. I haven't yet decided to fit an electric sender unit, either. From what I can tell, they are not at all accurate. I can probably pick up a mechanical Smiths unit
from somewhere, and just watch for leaks.
At any rate, I have working gauges.
The tachometer and speedometer need attention. I will be retrofitting and upgrading the tach, and I have yet to look at the speedometer. Those seem to be details for later.
Aluminum center console
I had only a few parts of the original aluminum center console with the original "dot pattern." They were not in great shape, and the run of the original part was
so brief — I think only in the 1963 model year — that replacements are pretty darned rare. (Raw aluminum with the correct press pattern is available for a dear price from Aston Martin Heritage. See the
"Crosshatch aluminum" section on a previous entry.) I considered machining my own raw stock, but I figured it wasn't worth it, especially
after I had played around with some aluminum just to see what it was like to work with. Aluminum has this rich and deep shine to it, once it's been polished,
and the metal can have a lot of interesting characteristics. I made a couple of pieces of the console using a "brushed" aluminum finish, and it, too, would be
good. I eventually figured that a somewhat polished finish would be really nice.
The plywood for the original center console was totally rotten, and so I had to make another one, and I used the original aluminum part to create a "buck" out of a hefty piece
of plywood to make the new replacement part. Since the plywood serves as the means of attaching the aluminum to the metal/vinyl console frame, I went ahead and
inserted machine screws in holes run through the plywood and countersunk. Number 6-32 machine screws went into the holes, and those went through the metal console
frame. It's sturdy, and removable, too. I did run into a problem with the console fitting onto the tranny tunnel, though, and so I had to grind off the screws that
I had placed down the middle of the console. Those screws met the highest part of the tranny tunnel, making it impossible for the console to go down entirely.
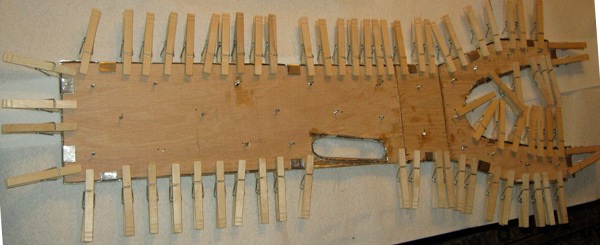
I used "Goop" to glue the aluminum to the plywood, and of course the tabs folded over to make everything stable. Clothespins have been useful, though also they've been a bit of a problem with holding vinyl in place.
As Bill McKenna noted, clothespins can leave dimples. I found that the way around this is to buffer the pins with short pieces of
cardboard laid along the surface that's being held in place. Of course, aluminum is less pliable and impressionable than vinyl, so the clothespins just fit onto this piece. A bag of a hundred pins has
served me well over the years.
The aluminum was regular old flat sheet 0.032" "5052" grade. I got a 24" x 48" sheet for under $20 USD, and I didn't bother shopping around. I tried out some thicker stock, but it gave me trouble on the
curves, such as where the parking brake lever goes through the console. The thin sheet worked fine with a little (gentle) convincing and pinching. Polishing took just a little elbow grease and rubbing compound.
I found that Wright's Brass Cleaner was good for the final polish, followed by a little wax to hold off oxidation.
There it is, all well fingered and smudged! I think this center piece will take a little attention now and then to keep in decent shape. I will be redoing the radio section of the console, since it doesn't fit the shifter cover part. I have plenty of aluminum sheet left so that's no problem.
And, of course, the voltmeter is completely non-standard, since it replaced an ammeter. I figured I'd much prefer a voltmeter after the alternator replacement I did, and ammeters seem to be a bit hazardous
in a cockpit to me. At least what I have does the measuring, even though it looks a little odd with the rest of the instruments.