
1963 Jaguar E-Type OTS
The story of a ground up restoration of a classic "XKE" Jaguar roadsterBonnet Metal Reassembled (1 - 4 May 2003)
|
|
|
|
|
|
|
| Bonnet Metal Reassembled
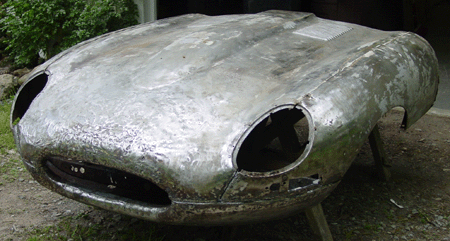
The goal for the week and the weekend was to get the metalwork on the bonnet to the point where we could put the external sections together. We needed to get to that point
in order to move toward the more detailed banging and pushing. We have indeed come a long way from the beginning, where Bondo was thick and sheet metal
was visible.
The various sections of the bonnet's external sections are fitted together with tabs that are attached with bolts and special "oval washers." These tabs we completely replaced on the foremost sections, and we are reinforcing the tabs running from the front to the back of the bonnet, at the junction of the two wings and the center section. Replacement of the tabs on the front was tedious, since it involved welding tabs to the section itself and then shaping a flat piece of sheet metal to fit over the tabs. We probably overdid it a little, since the tabs are now two thicknesses of metal in part. Also, we made the tabs almost twice their original width — I wanted to make sure that we had sufficient metal to drill and manipulate for the attachments.
The nose itself is almost correct. The areas at the center do not quite make the grade, and there will still have to be some gross shaping before we can resort to the
final tapping and eventual body filling. It's funny, but you really need to have the external sections together to see even the gross imperfections, since the pieces visually
act as a whole. When the lower bonnet section was apart from the rest of the bonnet's pieces, I could tell something was not right, but after fitting that section to the rest
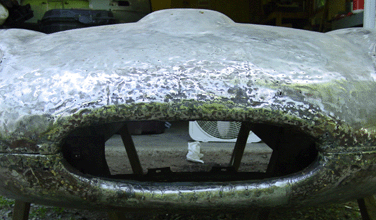
The mouth of the bonnet is extremely difficult to "get right" — probably because it is such a focal point for the body. It is extremely easy to get wrong. The pictures here show that the mouth is a little curled back still. I estimate that some sections need to go forward another centimeter or so. The timekeepers among visitors to this web page might be interested to hear that my original estimate of 60 hours for metalwork on the bonnet looks a bit too conservative, even though I thought that it was a bit rich when I originally sketched out the estimate. A lot of that underestimation comes from the "getting right" of the bonnet mouth. That seems an elusive goal, especially since the shaping of the metal is much more easily done when everything is apart and (unfortunately) the assessment of the shape is best done when everything is together. |
 But we have not achieved what's needed. The metal itself is now sound, though we do have a few gaps to repair. The severe corrosion on the nose has been removed and reinforced,
either by cutting out the offending section and replacing it with new metal (as on the left wing and the lower "lip" of the mouth) or by removing rust and reinforcing with an
inside plate of metal (as with the upper "lip" of the mouth and a few small sections on the lower part of the bonnet assembly).
But we have not achieved what's needed. The metal itself is now sound, though we do have a few gaps to repair. The severe corrosion on the nose has been removed and reinforced,
either by cutting out the offending section and replacing it with new metal (as on the left wing and the lower "lip" of the mouth) or by removing rust and reinforcing with an
inside plate of metal (as with the upper "lip" of the mouth and a few small sections on the lower part of the bonnet assembly).
 it became very apparent what needed to be pulled and pounded.