
1963 Jaguar E-Type OTS
The story of a ground up restoration of a classic "XKE" Jaguar roadsterBlock-Sanding the POR-15, More Tweaking of the Bonnet and Doors (29 September - 8 October 2003)
|
|
|
|
|
|
|
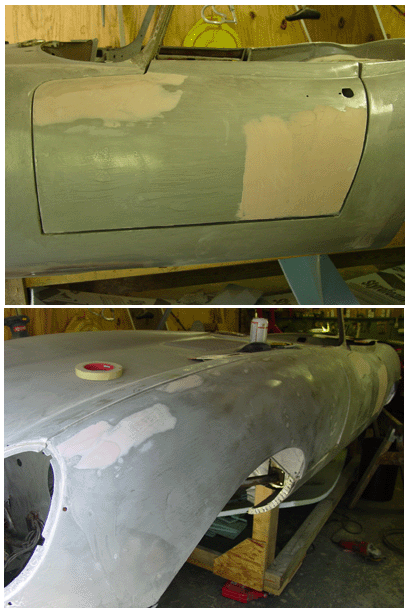
| Why Block-Sand the POR-15 Coating?
It's a fair enough question. The POR-15 coating isn't going to be the coat to accept the final finish. There's primer to be applied over the
The answer has a couple of facets. First, I applied the POR-15 in part to seal the work we'd done and provide immediate rust protection. This seemed important because we didn't expect to complete the body shell very quickly, meaning that sections of the body shell would be exposed for some time. We applied the POR-15 with brushes, and I have to admit that we didn't worry too much about drips. So, the POR-15 coat protects the body, but it doesn't particularly make a smooth surface to prime. Second, block-sanding at this point gives us the chance to discover areas on the body shell that escaped notice. As you go over a surface with a block, you notice flatnesses and irregularities. And, when you do that noticing in an ordered manner, you see things that you otherwise wouldn't. For example, I noticed a problem with the right side headlight opening on the bonnet some time ago, but I couldn't quite figure out what the problem was. The process of block-sanding trained my senses so that I could remedy the oddness with a smidgeon of body filler. I think block-sanding has its uses as a psychological tool — training consciousness to details that otherwise would slip by. The process is in fact as much tactile as it is visual, and the block itself sensitizes your touch to irregularities. We used a 11-inch block, a four-inch block, and a home-made block of about 14 inches. A note on this round of block-sanding: I didn't use any spray paint coating to serve as a contrasting "marker" paint. We'll do that later, after we apply the real primer and are ready to do the real block-sanding. The POR-15 served as its own marker, since the sanding dulled the finish and dusted it enough to show contrast in the low areas. Basically, we took the top off the POR-15 coating, though I doubt much actually came off. The stuff is incredibly tough. It was good to have the car a single more-or-less uniform color, too. Dappled colors disguise ripples and imperfections. The nice things about POR-15 is that you can go ahead and apply body filler right over the surface, though I chose to rough up the area before applying any Bondo. The POR-15 company has developed its own body filler that is suppose to have even better binding quality to POR-15. They also claim to have used more resins and less filler in their product. I haven't tested it, however. Bonnet Adjustment
I said a while ago that getting the bonnet mouth right is very challenging, and I returned to the bonnet front end with a fresh perspective and
sanding block in hand. I discovered sections on the right side of the center section of the bonnet that were either not in accord with
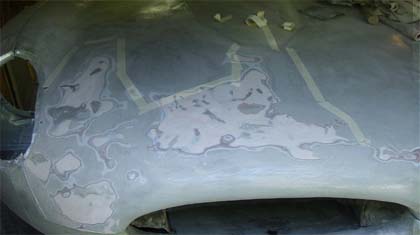
Actually, her comment motivated my attentions even more. I have nothing against Dodge Rams, by the way. I drive one daily with great satisfaction, though I'm not thrilled when I have to fill its gas tank. The picture of the bonnet center section is actually a composite of two photographs, one showing the masking tape marking areas that needed more aggressive sanding and the other showing areas after they had been sanded. The photo with the masking tape outline has been faded a bit, you'll note. I used an orbital sander with pretty aggressive sandpaper grit (100) to do the sanding. Over the course of the work, I had to pound down some metal that sanding revealed. This was a matter of using a rubber mallet to provide the impact against a ball pein hammer that I held in place. Several light taps usually did the trick. I sanded with the orbital sander until I wanted to check the surface (which was fairly frequently). I checked the flatness and the shape by using the sanding block with a gentler grit sandpaper. The pounding down of protruding metal had the good effect of straightening and flattening the metal and lessening reliance on body filler. Unfortunately, the pounding also had the effect of breaking and otherwise disturbing filler I had applied inside the bonnet. I'll have to remove some filler there as well. (This mistake I have since learned has been repeated by a number of people who have taken on bonnet restoration.) If I were to do another bonnet like this (and that is a very big if), I would completely finish the outside of the bonnet before applying even a drop of body filler to the inside. When it's all done, the inside of the bonnet is of course far less critical than the outside, and having to redo the inside at least wastes time. Door and Wing Filler At this stage, fitting the doors to conform with the body was important to do. Although I've been pretty happy with the way the doors fit, both the right and left side doors needed some adjustment. This was especially the case in the lower rear section of the doors. I had already finished the "B" Pillars to my satisfaction, and so I knew where the door skins should meet the body. It was really just a matter of adding about a sixteenth of an inch of Bondo and feathering it in. The left door needed a little body filler in the upper front corner as well. The amount of space that the filler takes up might seem a bit alarming, but it needs to taper very carefully into the door shape, so you actually cover quite a bit with a very, very thin layer. The coverage of the lower rear section in the picture above is actually less than the door eventually ended up with. Think thin with filler. I did the same touch up on the two bonnet wings. These had some little dents and flatnesses that appeared during the block-sanding. Isabel Wasn't a Big Deal, Picture of Yours Truly
Hurricane Isabel didn't make too much of a mark on us. We had about twelve hours of no electricity on a very nice day, so we got through without much
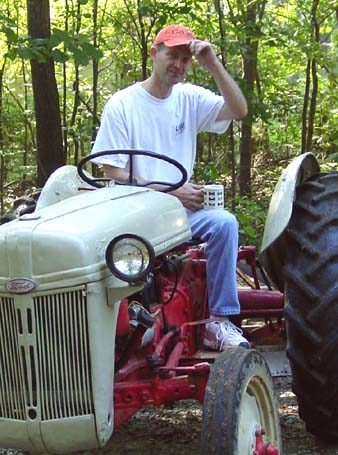
No problem. There's never been a picture of The Author on this website, I guess. Here's one: me, tipping my hat to my wife as I sit atop a 1951 Ford tractor while having a coffee break. We were moving dirt around and grading the driveways, and the tractor was efficient. My father tells me that he managed to wreck a tractor like this one when he was a kid. I happen to think they're charming little workhorses, and worlds more solidly built than any other vehicle I've seen. Of course, there is a bit of a comfort penalty for all of that cast iron and steel. So, I tip my cap to you, too! |
 POR-15. So, why block sand at this point, when spraying "high-build" primer at this point would actually make sanding much easier?
 the left side (which was, I should add, fairly preserved from collision damage) or felt higher than was to be expected. That side of the bonnet mouth
and the section above the mouth was too round, giving the impression of looking "like a Dodge Ram," as my wife put it.
the left side (which was, I should add, fairly preserved from collision damage) or felt higher than was to be expected. That side of the bonnet mouth
and the section above the mouth was too round, giving the impression of looking "like a Dodge Ram," as my wife put it.
 inconvenience at all. We had
no water, of course, since the well pump uses electricity, but we had filled bathtubs and a few large containers with fresh water before the
storm hit. And when the storm did hit, it provided some entertainment and very little terror. Actually, no terror at all — just some
wondrously bending trees. We had some clean up after the fact, but this we were able to take care of in a day.
inconvenience at all. We had
no water, of course, since the well pump uses electricity, but we had filled bathtubs and a few large containers with fresh water before the
storm hit. And when the storm did hit, it provided some entertainment and very little terror. Actually, no terror at all — just some
wondrously bending trees. We had some clean up after the fact, but this we were able to take care of in a day.