c h r o n o l o g i c a l
g u i d e
> Year 1 Year 2 <
> Year 3 Year 4 <
> Year 5 Year 6 <
> Year 7 Year 8 <
> Year 9 Year 12 <
fetching & dismantling
sandblasting & evil rust
right "b" pillar
fixing right inner sill
basic body repair, por-15
frame removed, footwell repair
hole fixed, car flipped, etc.
sill stiffeners, rear bulkhead, etc.
various small parts
left sill, added stiffener, etc.
- lousy weather
trunk floor (reprise)
right floor, left sill, etc.
left floor, wheel well, etc.
right upper wishbone
floor done, car righted
rack, front frame, evil rust
left door cleaned & fitted
right door, right suspension
bonnet, part 1
bonnet, part 2
bonnet, part 3
bonnet, part 4
bonnet, part 5, etc.
bonnet, part 6
bonnet, outer sill, etc.
lots of stuff
left side, bonnet internals
frame, bonnet attached
engine stand, oil pan removal
pistons removed, sanding
sanding, final filling
color, frames, primer
brushed primer test
2nd coat primer
holiday greetings!
finish prep, detail on dent fix
spraying primer
winter chores
1. undercoat, plating prep
2. plating, spraying color
bonnet, plate prep, cylinder head
cylinder head paint, bushes
plating saga
front frame, suspension, part 1
front suspension, part 2
front suspension, part 3
priming and painting
bonnet, part 7
painting color!
boot lid, steering wheel
gas tank
winter chores
1. firewall sundry
2. front suspension
3. steering setup
4. master cylinders/pedals
5. the rest
data plate screed
winter to spring
1. irs rebuild
2. trunk floor, harness
3. data plate (again)
data plate, door, headlights
dash vinyl, crosshatch aluminum
windshield, right door
interior, "widget"
chrome parts!
door handle details
rolling chassis
molasses rust removal
electrical, part 1
bores, thrust washers
new engine!
head differences
block differences
compression ratio
engine in place!
alternator
catchup & photos
it runs!
setback and brakes
darned close & engine diffs
driven
top and seats
driving and little stuff
|
|
|
irs rebuild ||
trunk floor, harness ||
data plate (again) ||
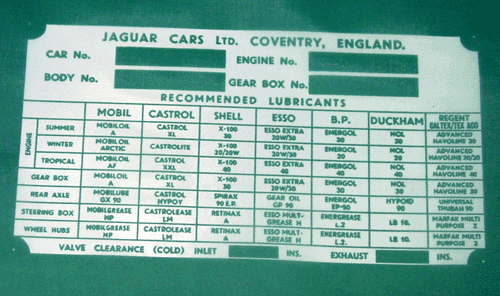
1963 Jaguar E-type Data Plate, Continued
The data plate obsession has just about run its course, thank goodness.
I fussed with the artwork for what seemed like a very long time, and finally the job turned the corner when Eric Malossi pitched in with
his Photoshop skills (which were just a bit better than mine) and his critical eyes. By picking harder at smaller sections of my retouchings
we came up with a truer piece. I went through his work and he, through mine. The result was better than either of us could have concocted
 on our own.
The piece went off to the pros for laying onto metal, but not before I had at it with some silkscreen. I do think that large runs of plates like
this would use some variant of silkscreen, and I think that the original plates used the process, though not to print black — as today's
shop most likely would — but to put down a masking lacquer coat prior to metal etching. I found that the silkscreen method I used left
details too foggy, and this was the fault of the method, not the artwork. I used no camera or even a transparent image but instead used
a regular old laser printed copy on some regular old copy paper. It works for T-shirts. It doesn't work for data plates.
On the original plates, I think the process was etch and anodise, and the corners of the letters on the original betray the method. They are rounded —
eaten a bit by the etching solution. That fact made the artwork for the replacement plate a bit harder, since the letters had to reflect a little roundness even though
the individual pixels of the image are square. (The artwork uses a 300 dots-per-inch screen, so it is fairly high resolution.)
So, when will the data plate be back from the shop? I hope soon, at least something mid-summer.
|
|
| |

