
1963 Jaguar E-Type OTS
The story of a ground up restoration of a classic "XKE" Jaguar roadsterPrimer, Block-Sanding (20 - 25 October 2003)
|
|
|
|
|
|
|
| Paint-Primer-With-A-Brush Hypothesis Tested
I mentioned at the close of the last entry that I was going to test out whether "high-build" primer could be painted on with a brush and still have it serve
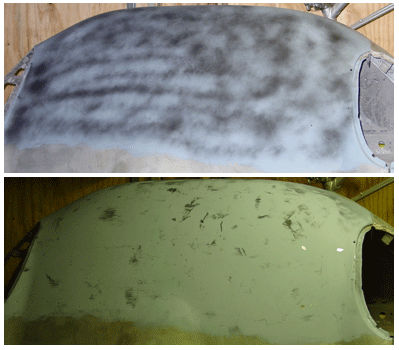
I applied the Tie-Coat to the bonnet nose, which needed some smoothing in any case. I put on two coats, and after they had set I sprayed a thin coat of regular old flat black paint. The black paint was the "guide" coat that would mark where I had sanded and would highlight low areas on the surface. if the test worked the sanding after this initial primer would leave a perfectly smooth surface, leaving slightly rough and darker patches where low areas would be. High areas would become the color of the underlying POR-15, since the primer would be entirely removed with sanding. Only block sanding is allowed at this point. Taking some wet sandpaper in hand and trying it out with your fingertips just leaves grooves and usually frustrates the purpose of the marker paint coat, since your fingertips just follow the surface, however rough, and take off the paint. The picture of the bonnet nose shows the light black marker paint over the buildable primer and the block-sanded surface. The bonnet, you might recall, has been a real challenge, and the marks show it. These marks are mostly well defined notches where body filler wasn't adequately applied. Most low areas end up looking like shadows where wider, less detectable, depressions lurk. I'm happy to report that the paint-primer-with-a-brush hypothesis tested out just fine. However, I do think there is a bit more waste of primer, and perhaps coats need to be applied a bit more thickly. This is because you have to sand through the brush marks, which appear quite clearly after the first swipes of the block over the surface. There also may be a bit of a tendency to remove too much primer in certain areas in order to remove brush marks. My suggestion is to remember to use reasonably long swipes of the block and avoid concentrating effort in any area. If you are using anything shorter than a 20-30 centimeter (about a foot) stroke with the block, you are probably going too hard at an area. If you use a small block to get at tighter areas or corners, be extra careful. Because of the brush marks, I'm a little suspicious about applying final primer coats with a brush. It might be counter-productive, though I am going to see whether it's possible by watching this project. I do think that brushing at least an initial coat makes good sense, and it probably can allow people to avoid a mess with sprayers. A footnote: I was originally thinking that I would use Tie-Coat to prepare the surface to accept another high-build primer, but I learned from the POR-15 people that they don't recommend mixing primers like that. They told me in response to an email question that Tie-Coat is a buildable primer and using another primer over it might have unexpected results. They responded quickly, too, I'm happy to report. I don't know about the response, though, since it might have been designed to drum up more sales of Tie-Coat Primer. I'm not taking any chances, however. I'll be using Tie-Coat as the one-and-only primer for this project. Initial Brush Priming the Body Shell
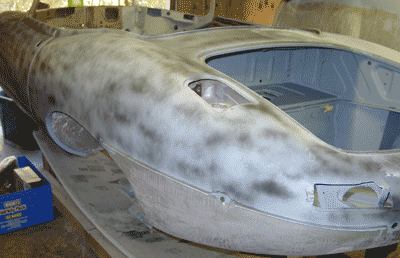
After the bonnet experiment tested well, I went ahead and brush primed the body shell first with a thin coat of Tie-Coat Primer and then after it had set overnight
a thicker coat — at least a coat that ended up with some drips here and there.
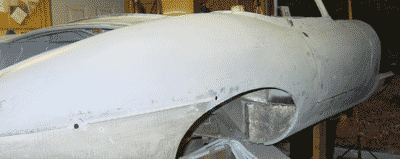
I used 320 grit wet sanding on two different block sizes, a four-incher and a nine-incher. The smaller of the two worked very well on the rear upper quarter panels (the "humps" to each side of the trunk space over the rear wheels). The larger block worked merely acceptably on the larger flat areas on the sides and forward on the body shell. I say acceptably, since the right door gave me a fair amount of trouble. I had built up the rear lower section of the door so that it met the door frame, and I expected that there would be irregularlities that would come through in the marker paint. Oddly enough, the door blocked to a light blue, practically without a bit of marking paint appearing, even though irregularlities were quite easy to feel, and pretty easy to see when the piece was cleaned and shiny with water. I should add that the "Carolina Blue" color of the primer was not my choice. That's apparently the only color Tie-Coat comes in, or I would have chosen something else! This is the only time this car will appear light blue, at least as long as I own it.
But, back to the block issue. I didn't want to use the longer home-made block, since it lacks the soft covering behind the sandpaper, and I didn't want to gouge
the surface with a slip. I do think that either I need to get better with the nine-inch block, or I need to find a much longer block to do the sides. I've noticed that the body
folks at Classic Jaguar have a huge block with two handles on it to do the side panel and door work. The flat surface of that block must be about a meter long, since it
easily straddles the length of the door and overlaps well over the ends of the door frame. A good long block would come in handy when you block up the body shell, the outer sills
and the bonnet, I suppose.
Block sanding is not very interesting, though it does have some rules. First, keep the block parallel to the line of contact. In other words, if you are block-sanding
a curved surface, the contact points of the surface should be a consistent line from the front to the back of the block. Second, move the block diagonally across the surface,
first in one diagonal and then after you cover the surface, along the opposite diagonal. In effect, you make an "X" shape with the directions of your sanding over the surface.
Third, thoroughly block the surface, but don't dwell on any one place too long. With "high-build" primers, it's pretty easy to oversand an area. And, fourth, use the block,
not your hands. You can't believe how many times you'll be tempted to "touch" up an area with your fingertips. You can't believe how many times you'll screw it up. If you can't resist
the urge, use very, very, very light pressure with your fingertips, and don't dwell on a specific area. I've found that even trying to rub down drips of the brushed primer
with fingertips is counterproductive. The block is much better.
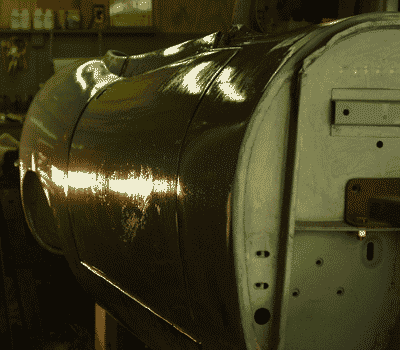
I got the entire external section of the upper body shell completely block-sanded in about seven hours, I would guess, after subtracting interruptions and breaks. Like I said, this is not very engaging work. It's repetitive without a doubt. I checked the surface by wiping it with some low-concentrate soapy water and then looking at the reflection of flood lights along the surface. The lines should be predictable, and you shouldn't see small wavers (except where you'd be expecting them). The dark picture shows the floods reflecting against the right side of the car. There are some pit-like reflections that come from small soap bubbles. You can see a wavering of the reflection in the door, where irregularities widen the reflection. I usually get a good long reflection in view and then move up and down to see the reflected line travel across the surface. In the case of this side of the car, I should see a consistent line. I didn't because of irregularities in the door panel. It still needs work. But the rear quarter panel is in pretty good shape. I also used a little bit of Evercoat "Easy Sand" body filler to bring up a couple of areas on the left side — one flatness over the rear wheel well that I mentioned before and flatness where I repaired the "fillet" some time ago. Very little of the body filler was required. That Evercoat product, by the way, was good to use and seemed to set well. I now wish I had used the Evercoat body fillers from the beginning. Second Coat of Primer I decided to try brushing the second coat of primer. (I'm planning on three coats for external sections of the car.) Instead of applying a coat that would drip, I applied two fairly thin coats, and I've applied a third thin coat to areas I think need a little more coverage. I'll let the primer dry well and apply a marker coat of paint sometime this week. Then it's back to blocking again. I'm debating what to do about the nine-inch block. Do I try to use it again? Do I look for a longer block? Do I try to make a long block myself? |
 its purpose. Well, I didn't use a typical sprayed "high-build" primer, though I used a "sandable/buildable primer." The coating is "Tie-Coat Primer" that I needed to use to bond coatings
to POR-15. POR-15 is very tough, and it has properties that make it tough to get regular primers to bond to it. Basically, you have to sand the surface
rough in order to get primers or paints to stick to it. Or, you use Tie-Coat Primer.
its purpose. Well, I didn't use a typical sprayed "high-build" primer, though I used a "sandable/buildable primer." The coating is "Tie-Coat Primer" that I needed to use to bond coatings
to POR-15. POR-15 is very tough, and it has properties that make it tough to get regular primers to bond to it. Basically, you have to sand the surface
rough in order to get primers or paints to stick to it. Or, you use Tie-Coat Primer.
 After that coat set, I sprayed a dusting of the flat black paint as a marker coating. I made sure that the primer itself had set before I did any block-sanding. (Tie-Coat is supposed to accept
topcoats after no less than 24 hours after application.) Since temperatures had been below 60 degrees Fahrenheit (about 15 Celsius), I gave the primer about 48 hours
before I tried blocking.
After that coat set, I sprayed a dusting of the flat black paint as a marker coating. I made sure that the primer itself had set before I did any block-sanding. (Tie-Coat is supposed to accept
topcoats after no less than 24 hours after application.) Since temperatures had been below 60 degrees Fahrenheit (about 15 Celsius), I gave the primer about 48 hours
before I tried blocking.
 You'll need to keep the block quite wet, too. The primer soon turns into a gooey lubricant if you don't rinse it off. I used warm water with just a few drops of dishwashing
soap. The soap seemed to help keep the sandpaper clear, and yet there wasn't so much in the water that soapy film became a problem. An old cake pan worked great as a container.
Wipe the blocked surface with a wet cloth to get the sanded primer out of the way.
You'll need to keep the block quite wet, too. The primer soon turns into a gooey lubricant if you don't rinse it off. I used warm water with just a few drops of dishwashing
soap. The soap seemed to help keep the sandpaper clear, and yet there wasn't so much in the water that soapy film became a problem. An old cake pan worked great as a container.
Wipe the blocked surface with a wet cloth to get the sanded primer out of the way.