c h r o n o l o g i c a l
g u i d e
> Year 1 Year 2 <
> Year 3 Year 4 <
> Year 5 Year 6 <
> Year 7 Year 8 <
> Year 9 Year 12 <
fetching & dismantling
sandblasting & evil rust
right "b" pillar
fixing right inner sill
basic body repair, por-15
frame removed, footwell repair
hole fixed, car flipped, etc.
sill stiffeners, rear bulkhead, etc.
various small parts
left sill, added stiffener, etc.
- lousy weather
trunk floor (reprise)
right floor, left sill, etc.
left floor, wheel well, etc.
right upper wishbone
floor done, car righted
rack, front frame, evil rust
left door cleaned & fitted
right door, right suspension
bonnet, part 1
bonnet, part 2
bonnet, part 3
bonnet, part 4
bonnet, part 5, etc.
bonnet, part 6
bonnet, outer sill, etc.
lots of stuff
left side, bonnet internals
frame, bonnet attached
engine stand, oil pan removal
pistons removed, sanding
sanding, final filling
color, frames, primer
brushed primer test
2nd coat primer
holiday greetings!
finish prep, detail on dent fix
spraying primer
winter chores
1. undercoat, plating prep
2. plating, spraying color
bonnet, plate prep, cylinder head
cylinder head paint, bushes
plating saga
front frame, suspension, part 1
front suspension, part 2
front suspension, part 3
priming and painting
bonnet, part 7
painting color!
boot lid, steering wheel
gas tank
winter chores
1. firewall sundry
2. front suspension
3. steering setup
4. master cylinders/pedals
5. the rest
data plate screed
winter to spring
1. irs rebuild
2. trunk floor, harness
3. data plate (again)
data plate, door, headlights
dash vinyl, crosshatch aluminum
windshield, right door
interior, "widget"
chrome parts!
door handle details
rolling chassis
molasses rust removal
electrical, part 1
bores, thrust washers
new engine!
head differences
block differences
compression ratio
engine in place!
alternator
catchup & photos
it runs!
setback and brakes
darned close & engine diffs
driven
top and seats
driving and little stuff
|
|
|
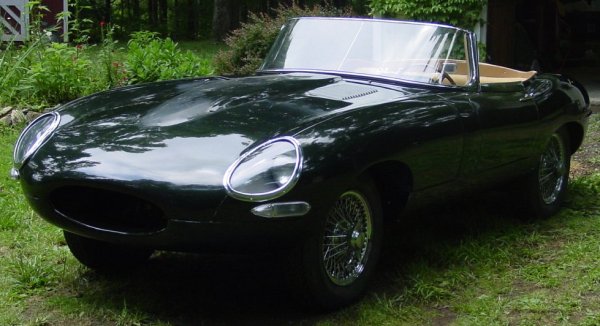
Rolling chassis
At last the car is on four wheels after almost four years of being suspended on a makeshift rack or jacks — or (in part at least) being encased in
Ziplock baggies. Derek and I pushed it out of the outbuilding and into the little grassy area where a rose garden once bloomed, back when the car first arrived.
The Opalescent Dark Green photographed well in these shots, but I had to contend with brightness. As a result the fire in the color seems to lack a bit.
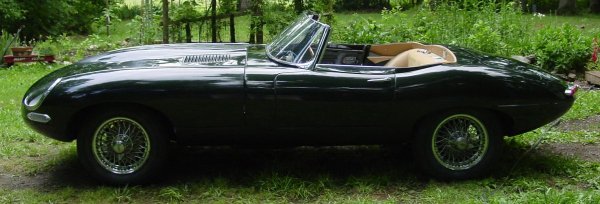
This side is the nice one, at least for the wheels. The wheels that came with the car were for a later model, and so I had to get the "curly hub" version.
I went back and forth with buying completely new wheels, but I already had bought two used wheels and decided to try cleaning them up. They cleaned up nicely,
and the few replacement spokes I installed got rid of a couple of spoke voids and a couple of rough looking ones. I was able to salvage a handful of the long
spokes from a later model (not the "curly hub") wheel. The shorter, so-called "bent" spokes were available from XKs. I decided to spend the new wheel money
 somewhere else — I'm sure to have plenty of places to drop the cash.
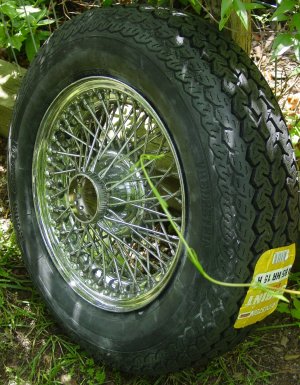
I went with Vredestein 185/15 tires, and I am very pleased with them — at least for their look and feel. I can hardly wait to discover how they
drive. They came with pretty good reviews from other owners. I like the fact that they are pretty close to the right measurements in comparison to the original
Dunlops. I now know more about tire "aspect ratio" than I thought I'd every learn. These tires sit "higher" off the rim than more modern tires, with a sidewall
"aspect ratio" of between 75-80, I believe. Aaron did the wheel balancing at the Northern High School automotive shop.
At any rate the tires are handsome in blackwall.
The other side of the car has the rusty wheels that came with the car. I will probably salvage the best of these oldies to clean up, sandblast, and paint
for the spare. But for the other side of the car, I'm going to watch for a couple of replacements that need cleaning.
The car is noticeably higher in the front, of course, because there's no engine under the bonnet. But it is much easier to do the color sanding and polishing of
the bonnet, now that the car is lower. When it was on the jacks, the bonnet's performance bulge was quite a reach. The bonnet really needs color sanding, too.
It seems that large flat areas of the car demand a great deal of attention because every little hint of orange peel pops out to the eye.
Why this is only "mostly" a rolling chassis
When I put on the rear wheels I made an important, though annoying, discovery. The real wheel hubs are on the wrong sides! The knock-off hubs just wouldn't
go on the sides that they were labelled for. When I put them on the side opposite, they screwed on nicely. I thought a few choice words, and I peered up into the
IRS to see how difficult a job it will be to make a switch of the hubs. It shouldn't be too much of a problem, and I should be able to do the job in situ.
But instead of having a "rolling chassis" with a good portion of the interior installed, I'm stuck with having a "rolling chassis, mostly."
Of course, you can't just leave the hubs on the wrong sides, either. If you do, the rotation of the rear wheels would loosen the hubs, and you could
find yourself in the weird circumstance of watching a wheel glide past you while you're under way. (At least until your rear corner dips and you lose control of the
car.) I now know yet another reason why splined hubs are a bit of a pain, in spite of the coolness factor they lend to the car.
|
| | |
