
1963 Jaguar E-Type OTS
The story of a ground up restoration of a classic "XKE" Jaguar roadsterFrame Temporarily Installed to Fit Bonnet (04 - 06 August 2003)
|
|
|
|
|
|
|
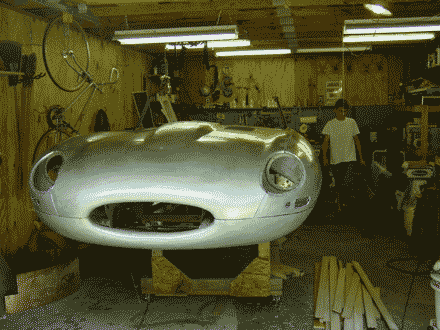
| I'm so pleased that at last the car has a shape that I'll test your connection speed with a bigger than usual image. This is a temporary fitting of
the bonnet, for reasons that are spelled out below. But here it is — the old car in a car-like shape!
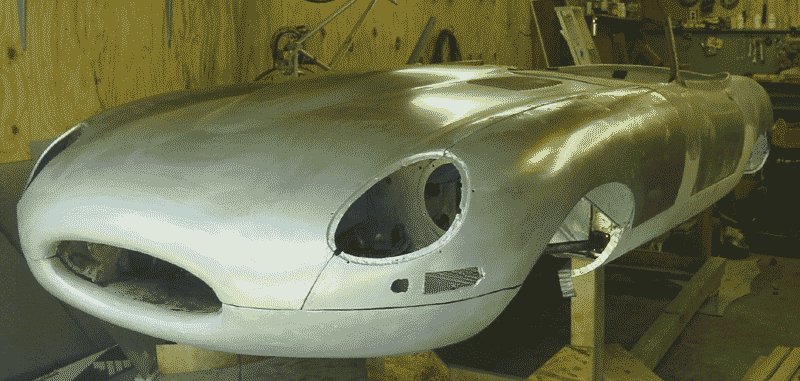
Frame Temporarily Installed
After getting the bonnet more or less together, I got anxious to fit it onto the shell so that the entire car body would again appear as a whole. Even
The frame pieces are in decent shape, though I was disappointed to discover corrosion damage on the left frame (see entry for 16 March 2003). The damage was in the usual place, near the battery area. And a corrosion hole had eaten its way through an upper forward tube as well, though I don't know exactly why this place would be susceptible to rust. I've found someone to repair the frame. The picture frame had dents where careless mechanics had used a jack without supplying a wood insert to protect the picture frame. These I pounded out quite handily. The good frames are shown in the brown primer in the picture. The less stout frame that is designed to support the radiator and the bonnet hinges was suspicious to me even as we stripped and sandblasted it. For some reason it didn't look quite square to me. I thought at one point that perhaps the irregularity was actually an element of the design — perhaps the bonnet hinges were slightly offset for some reason. The picture shows the irregularity if you look carefully at it. The bar separating the bonnet hinges (there's only the right side one installed in the picture) favors the left side of the car (the right side of the picture). Bonnet Fitted Onto Frame
Aaron and I wrestled the bonnet into position and loosely tightened bolts through the bonnet hinges. We noticed that one side was fairly easy to fit
I think what we're seeing in the badly fit bonnet and the irregular bonnet frame is the leftovers of accident damage. The question I had was why these
bonnet issues weren't apparent when we first saw the car. Even the smashed up nose couldn't have hidden a Grand Canyon Gap at the back of the bonnet.
I had noticed two pairs of holes roughly coinciding with the standard hinge holes. The photograph shows both sets of holes, with the "real" hinge attachment holes circled. I thought that perhaps the extra holes, which are slightly larger than the regular holes, might have been actually earlier holes cut into the lower section for some other hinge fitting or perhaps for wiring or whatever. The "real" holes appear in groups of four, two for a horizontal set of bolts, and two for a vertical set. In this way the hinge itself fits tightly into a corner and restricts upward-downward and forward-backward movement. The larger extra holes only appear on the vertical plane — for bolts that fit horizontally. I went back to the photo archive and discovered that indeed the larger holes were used to fit the bonnet (see the hinge mount bunched toward the left of the lower valance with no large hole apparent). It fair to assume that the bonnet frame was bent toward the left, perhaps in the accident that damaged the nose initially, and the bonnet was altered by fitting it to new holes instead of the bonnet frame being repaired or replaced.
I think we'll fix this problem by having the bonnet frame repaired. I don't think it'll be too much of a challenge, since the irregularities in it are
If you go under the bonnet and situate yourself where the engine will eventually be, you can see that the bonnet frame tubes nearly touch the internal bonnet wall on the left side. On the right side there's plenty of room. It is apparent that the bonnet walls were fashioned to wrap around elements of the frame. It's really a nice piece of design work — and I suppose only the designers and those of us fortunate enough to do this kind of restoration are privileged enough to see those details. I've heard it said that the E-Type is a study of the ellipse. It certainly is that, and marvelously so. But seeing the fluid lines of the bonnet internals wrap around the frame is also a design delight, though one less apparent than the elliptical shapes of wheel wells, bonnet "mouth," headlamps, or the cockpit.
|
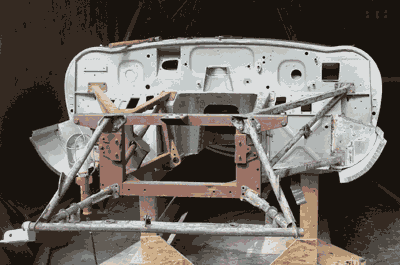 though I still haven't glued the bonnet pieces together, I figured this would be a good time. As a matter of fact I was hoping that fitting the bonnet
to the frame would help clarify any adjustments that I might need to make to get the bonnet internals ready for the adhesive. I crudely tacked the
bonnet internals together with some of the bolts and screws and "oval washers" — but I hadn't by any means fit them all.
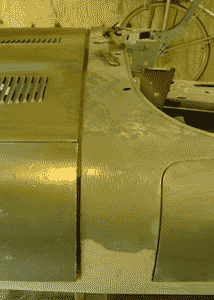 and attach, but the other side (the left) needed a bit more coaxing. Even from the gross fitting, it was apparent that the gap between the back of the
bonnet and the body shell was simply too big to surmount. This was especially the case on the right side of the car, where the gap is almost two centimeters
wide. On the left side, the gap is almost a normal size, though the bonnet appears to be pitched a little toward the left. Also, the gap was large
to begin with, so the only adjustment we could make was to draw the bonnet forward by tightening the hinge bolts. But, of course, they only tighten so far.
I believe the usual adjustment is expanding the fit of the hinges to the bonnet — in effect loosening the hinge bolts. This is done with
shims. The use of shims helps to widen the gap where bonnet and body meet, and heaven knows we don't need it any wider there!
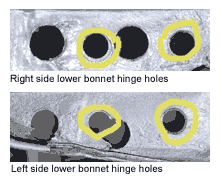 This is where some odd holes I noticed come in, along with the benefit of taking lots of photographs of the car at disassembly.
 quite apparent. Then I'll have to repair those silly extra holes!