|
Alternator bracket and alternator installation
This one is for Glen.
The XJ6 engine I got of course didn't have the exact same places to mount the alternator and other engine-driven parts (like an
air conditioning compressor). This meant that I was pretty stuck when it came to mounting the alternator, since the original
3.8 liter engine had a very different mount for its generator, and even the mounting holes on the 3.8 differed from those on the XJ6 4.2 liter
engine. I had to get a later mounting bracket and fit an alternator.
I could buy a mounting bracket, and indeed I searched around for one. The only one I could find came with extras for hanging an
air conditioning compressor. I wasn't really interested in paying the premium for a new part (which may or may not be quality).
So, it was time to fabricate.
I knew that Glen Jarboe was putting his 1969 4.2 liter E-type restoration to rights in Texas, and I suspected he might even have
his alternator bracket accessible. He and I had exchanged emails on a couple of occasions, most recently to discuss the way that
the E-type oil dipstick fit. So, I decided to ask him a few questions about the bracket.
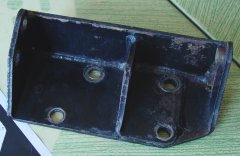
After a couple of emails, I had a scanned template in hand and good pictures of what the 4.2 liter E-type alternator bracket looked
like. (Two of Glen's emailed photos appear here.) He scrupulously described the original bracket in his car this way:
"The bracket is constructed of three pieces ... a front plate that attaches to the water pump and timing housing. A large plate
that is bent at a 90 degree angle to form a large flat base and a vertical face that attaches to the block. A strengthener plate,
oriented vertically, 3 3/8" back from the front plate and welded to the base plate. This should correspond the distance between
the alternator mounting arms."
Of course, I didn't have a means of bending the plate very easily, so I'd piece it, just as Glen also suggested. I could get the
fabricated bracket pretty close to the original, but whatever deviation from the original wouldn't be devastating. This was
a job that could do well enough if it was executed close enough. The placement of the holes was the least forgiving of the entire fabrication
job.
I used metal from an unused XJ6 bracket — just cut it up to get the flat pieces. I had the front part of another XJ6 bracket (one
that I believe was originally used for the XJ6 alternator, as a matter of fact), and that one I pressed into service as well. The metal
sometimes needed a little filling or extension here and there, but overall did the job. The vertical "strengthening plate" was made of
metal I salvaged from a cast off angle iron. (I keep most cast-off metal, since it seems to come in handy sometimes, though it's easy to have
the shop descend into even greater messiness.)
The actual fabrication was pretty straightforward. I spent more time arranging to get time to do the job than actually to do it. Aaron did
the best welding. I managed to blob welds pretty nicely, but they won't move, I can tell you. The pieces of metal I cut generously,
meaning that I eventually had to grind out a fair amount of metal to get it to looking more like Glen's original. One thing I did not do was
worry about the threaded fitting at the front plate of Glen's bracket. I used a nut instead, and I didn't weld it to the bracket.
The actual alternator instructions come from Ray Livingston, who documented his installation of a Hitachi alternator for
E-type Lovers (http://www.xke-lovers.com/). His
PDF is available through that website.
I haven't gone through the entire process of altering the Lucas regulator yet, but Ray's instructions were pretty much on target. I got
my alternator online, so I wasn't able to double-check the fit of the original fan and pulley, but they were exact fits in any case.
The PDF explains the alterations with care. Now, Ray was interested in upfitting a 3.8 to an alternator set up, so his mounting
bracket was a special one he got from XKS Unlimited. It used the 3.8 liter generator mountiing holes to fit the bracket, and those holes
were utterly lacking on my "new" 4.2 liter engine block. The choice of a new Hitachi alternator worked nicely, though — at least as
far as fit goes.
I'll do the electrical alterations at a later date.
Other stuff
I have been collecting parts with a focus on getting the engine running this spring. Since Arlene reported today that the daffodils are beginning to
come up, I'd better get going.
I decided to go with an external fuel pump. I have two of the originals, one hopelessly corroded and the other a bit gunked up. These
are submerged pumps, and for some reason I can't get myself used to the idea of putting a forty-some year-old Lucas fuel pump into a
 tank of gasoline. So, I took the pump off the mounting plate, and redid the fuel intake arrangement. I'm going to use a Facet pump that
I got from Aircraft Spruce and Specialty Supply (http://aircraftspruce.com/).
The Facet pump is model number 40105.
tank of gasoline. So, I took the pump off the mounting plate, and redid the fuel intake arrangement. I'm going to use a Facet pump that
I got from Aircraft Spruce and Specialty Supply (http://aircraftspruce.com/).
The Facet pump is model number 40105.
Of course, there are new submersible fuel pumps available, but the size and simplicity of the Facet pump was quite appealing to me.
Yes, the whole pump fits into the palm of my hand, as shown in the picture, and it delivers about the right pressure, so I shouldn't
need to install a pressure regulator upstream from the pump. I've seen discussions of this pump in various car forums, and it seems
to get good reviews. For me, the size is a real benefit. It will easily fit in the lower trunk/boot compartment, though I've not yet
mounted it. Besides that, it will easily fit into a tool box, and it wasn't expensive, so having
a spare on hand makes sense. I think I spent maybe around $40 USD on it.
I also set up an oil cooler, since the oil filter mount on the XJ6 engine I used needed some rethinking of circulation to the sump in any
case. I don't have any pictures, but I will get some and post them sometime. I do wonder about the airflow restriction that might come
about by having a small and narrow oil cooler radiator in front of the engine cooling radiator. It could be that the additional cooling of
the oil will be offset by lesser cooling of the block, but I think it'll be all right. Something to watch, I guess, and if it's not working
out, I'll simply remove the oil cooler.
|
From an XJ6 mount to
an E-type mount, step-by-step
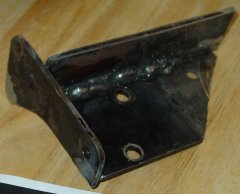
This is some bracket from the XJ6 engine I used. It may (probably not) actually be for the alternator on the XJ6, but
it's used at a much lower mounting point — the one used for engine mounts on the E-type. This piece provided most of the
raw metal for my alternator bracket.

Glen Jarboe was working on his 4.2 liter engine at the time, and he had an original mounting bracket for the 4.2 liter
engine. With a quick email exchange, he provided me an outline of the piece, templated from his part. A couple of
pictures gave me a pretty good grasp of what the finished product would look like. He scanned his template with some
measurements. He sent the scan as an email attachment. Hooray for the Internet!
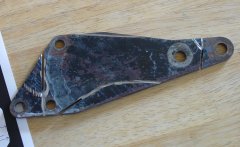
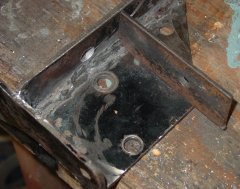
I did have a piece of another XJ6 bracket that mostly conformed with the front flat that I needed. I traced Glen's template
of the piece, and then cut the outline as best I could. The picture shows the partially cut piece. The missing metal and the
misplaced hole required some deft welding.

The template an the metal outline is complete. This piece is virtually finished. All I had to do was drill the hole for the
bolt that attaches the part to the front of the engine. My bracket did not have the large hole of the original piece (see
the large black circle on the template), because my plan didn't require using that kind of hardware or adjustment plan.
Tacked together, the bracket is mostly in shape. The front piece is tacked on very loosely in this picture. I attached the
front piece to the from the other engine (two bolts that go through the water pump housing), and then I clamped the angled piece
into place after sliding it against the side of the engine where it would attach. After checking the tack welds against the
place where the piece would go, I let Aaron do the final welds. (I was good with blobs of metal, but he's got MIG welding down
better than I do.)
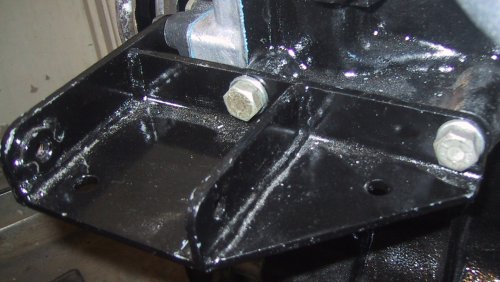
I loosely set the rear part of the bracket after setting the alternator onto the mount. It turned out that I should have put this
piece forward about a quarter- or half- inch forward (10-15 mm), so that I would have more forward adjustment possibility. Bolt
spacers are easy to use, but you need to have some room to play with. You can also see the holes for the bolts that attach the bracket
to the side of the engine block. I located these holes by covering the bracket with masking tape and then circling the bolt holes
with lipstick. Then I set the bracket in the right place, removed it, and then put the holes where the lipstick markings indicated.
The lipstick marked the "kiss" of the engine block against the masking tape. Romantic, I guess. Lipstick is a useful tool in my shop!
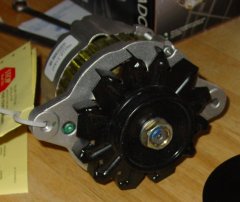
The Duralast rebuilt alternator for a 1980 Nissan/Datsum 720 2-wheel-drive pickup. It cost about $55 USD at Auto Parts Warehouse
(http://autopartswarehouse.com/). There are
lots of choices for this alternator. I chose to use the web, because it was easier.
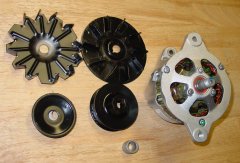
The Hitachi alternator comes with a fan and pulley that won't work (they're on the left). I took the pulley and fan off the original
generator. The new alternator accepts the fan and the pulley exactly, though there is some fettling required. I had a devil of a
time getting the pulley and fan off the alternator. I had to use my air impact wrench to remove the nut, which probably had some
sort of LocTite on it.
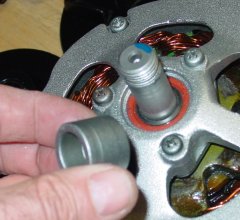
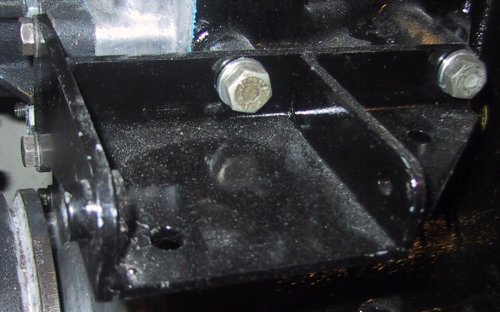
Between the alternator body and the fan sits a spacer. This is about twice as thick as it needs to be for the Jaguar fan, so I cut
it in half. Adjustments in the line-up of the pulley can be done by shifting the alternator on the bracket either fore or aft. I found
that the place I put the rear part of the bracket holder was a bit too far to the rear. I didn't have much room to adjust the
alternator forward.
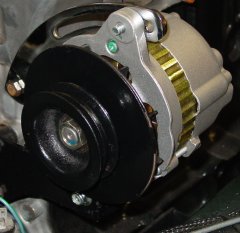
There it is! The curved alternator adjustment bracket was a regular old off-the-shelf bracket from AutoZone, and it was designed (I think)
for GM engines. I cut off just a little more than half of the length of the piece, and drilled a hole. It's chrome plated — I'd prefer
regular old Jaguar drippy black, but this will do. It's worth noting that the Hitachi alternator uses metric threads. The adjustment
bracket used a 8.8 metric bolt (though I have to admit I don't know what the 8.8 stamp on the bolt head meant).
|
