c h r o n o l o g i c a l
g u i d e
> Year 1 Year 2 <
> Year 3 Year 4 <
> Year 5 Year 6 <
> Year 7 Year 8 <
> Year 9 Year 12 <
fetching & dismantling
sandblasting & evil rust
right "b" pillar
fixing right inner sill
basic body repair, por-15
frame removed, footwell repair
hole fixed, car flipped, etc.
sill stiffeners, rear bulkhead, etc.
various small parts
left sill, added stiffener, etc.
- lousy weather
trunk floor (reprise)
right floor, left sill, etc.
left floor, wheel well, etc.
right upper wishbone
floor done, car righted
rack, front frame, evil rust
left door cleaned & fitted
right door, right suspension
bonnet, part 1
bonnet, part 2
bonnet, part 3
bonnet, part 4
bonnet, part 5, etc.
bonnet, part 6
bonnet, outer sill, etc.
lots of stuff
left side, bonnet internals
frame, bonnet attached
engine stand, oil pan removal
pistons removed, sanding
sanding, final filling
color, frames, primer
brushed primer test
2nd coat primer
holiday greetings!
finish prep, detail on dent fix
spraying primer
winter chores
1. undercoat, plating prep
2. plating, spraying color
bonnet, plate prep, cylinder head
cylinder head paint, bushes
plating saga
front frame, suspension, part 1
front suspension, part 2
front suspension, part 3
priming and painting
bonnet, part 7
painting color!
boot lid, steering wheel
gas tank
winter chores
1. firewall sundry
2. front suspension
3. steering setup
4. master cylinders/pedals
5. the rest
data plate screed
winter to spring
1. irs rebuild
2. trunk floor, harness
3. data plate (again)
data plate, door, headlights
dash vinyl, crosshatch aluminum
windshield, right door
interior, "widget"
chrome parts!
door handle details
rolling chassis
molasses rust removal
electrical, part 1
bores, thrust washers
new engine!
head differences
block differences
compression ratio
engine in place!
alternator
catchup & photos
it runs!
setback and brakes
darned close & engine diffs
driven
top and seats
driving and little stuff
|
|
| Left Floor Installed (20 - 22 February 2003)
This actually went quite quickly, even though our logs say it took two days. The issue was amount of time spent on each of those days. I set up a fair amount of
 welding, and Aaron did the welding, for the most part. As I said in the last entry, the floors look like Real Headway Being Made, even though the preparation — essential
as it is — consists of putzy little stuff. We push to make the putzy little stuff as painless to do as possible.
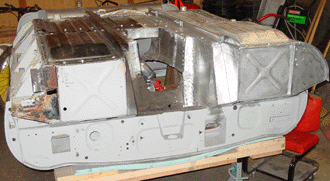
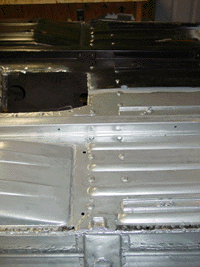
As with the right floor panel, we used a (non-standard) bolting strategy, with the bolts along the front end, the inside of the panel facing the transmission/engine space,
along the cross member, and along the back of the panel. Size of bolts and attachment strategy for the left side was the same as for the right.
Symmetry is good.
The outside edge
 of the panel (along the seam of floor panel and outer sill) had a very natural fit. We basically just laid the panel on the car and welded. However, the central portion of
the panel (behind the cross member where the right and left floor panels meet) seemed to bulge a bit. We will bolt that area in any case, and probably weld it as well.
As I recall, the original floor panels had a separate panel attached in this area, which is the part that forms the "floor" of the drive shaft tunnel. I don't know that
this original panel was an original part, in any case. (I haven't look at the notes or at the parts themselves, but this piece may actually have been something other than metal.)
The pictures I have seen of this area don't show a metal cover over the area. And yet, a sheet covering the area
where the floor panels meet actually doesn't sound like a bad idea.
I might just do it, since I've seen enough nasty rust form in that area.
The fitting of the entire floor means fitting the parts that straddle each floor panel, and this means the "rear floor stiffener" which I had fabricated earlier. As of 25 February,
we had just fit this piece using clamps, and we haven't welded or attached it to the floor yet. Here again we will be a bit out-of-the-ordinary, since I want to use 1/4 inch bolts to attach the
stiffener. We'll use eight bolts, four to each side. In between we'll spot weld.
Left Wheel Well Repaired
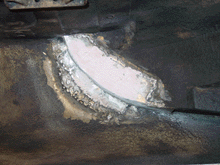
With the car flipped over, it was easy to get at the rust damage at the top portion of the left wheel well and the so-called "fillet" where the rear portion of the cockpit
 interior meets the lower edge of the convertible top. This area has been badly corroded, and crudely "fixed" with Bondo and wood strips (!). We had removed this blodged
repair, and intended on doing some metal work. That we did, with two pieces of 20-gauge metal. The first piece was aligned with the curve of the upper portion of the
left rear quarter panel, and the second piece (welded on top of the first piece from inside the wheel well) formed the fillet wall. As with other fixes, we ground off the
welding excesses, and
used Bondo to smooth the surface. We were actually less worried about how this fix looked, since it is in a place where you really need to want to look to see it at all.
After the application of Rock Guard to the area, this fix won't be easily visible. But trained eyes will see it, I guess. If they look for it....
I should say that cleaning the original rock guard from the inside of the wheel wells and the IRS corridor between them has been a real chore. I believe that the original
coating remained, but a later owner must have applied some "rust-proofing" to some areas, especially where we found significant rust damage. Fortunately (or not), these gunky areas were removed
in order to repair the rust. But residues of the goo remained in other areas, and just made a mess to clean off. An acetone-based solvent seemed to soften the coatings,
but not entirely dissolve them. We were able to scrape off a good deal, and then the solvents took off the rest. Or, at least the solvents made it possible to smear it around
a bit. For the record, the coatings were a yellowish color, though that might have been their age showing.
|
|

 welding, and Aaron did the welding, for the most part. As I said in the
  of the panel (along the seam of floor panel and outer sill) had a very natural fit. We basically just laid the panel on the car and welded. However, the central portion of
the panel (behind the cross member where the right and left floor panels meet) seemed to bulge a bit. We will bolt that area in any case, and probably weld it as well.
As I recall, the original floor panels had a separate panel attached in this area, which is the part that forms the "floor" of the drive shaft tunnel. I don't know that
this original panel was an original part, in any case. (I haven't look at the notes or at the parts themselves, but this piece may actually have been something other than metal.)
The pictures I have seen of this area don't show a metal cover over the area. And yet, a sheet covering the area
where the floor panels meet actually doesn't sound like a bad idea.
 interior meets the lower edge of the convertible top. This area has been badly corroded, and crudely "fixed" with Bondo and wood strips (!). We had removed this blodged
repair, and intended on doing some metal work. That we did, with two pieces of 20-gauge metal. The first piece was aligned with the curve of the upper portion of the
left rear quarter panel, and the second piece (welded on top of the first piece from inside the wheel well) formed the fillet wall. As with other fixes, we ground off the
welding excesses, and
used Bondo to smooth the surface. We were actually less worried about how this fix looked, since it is in a place where you really need to want to look to see it at all.
After the application of Rock Guard to the area, this fix won't be easily visible. But trained eyes will see it, I guess. If they look for it....