c h r o n o l o g i c a l
g u i d e
> Year 1 Year 2 <
> Year 3 Year 4 <
> Year 5 Year 6 <
> Year 7 Year 8 <
> Year 9 Year 12 <
fetching & dismantling
sandblasting & evil rust
right "b" pillar
fixing right inner sill
basic body repair, por-15
frame removed, footwell repair
hole fixed, car flipped, etc.
sill stiffeners, rear bulkhead, etc.
various small parts
left sill, added stiffener, etc.
- lousy weather
trunk floor (reprise)
right floor, left sill, etc.
left floor, wheel well, etc.
right upper wishbone
floor done, car righted
rack, front frame, evil rust
left door cleaned & fitted
right door, right suspension
bonnet, part 1
bonnet, part 2
bonnet, part 3
bonnet, part 4
bonnet, part 5, etc.
bonnet, part 6
bonnet, outer sill, etc.
lots of stuff
left side, bonnet internals
frame, bonnet attached
engine stand, oil pan removal
pistons removed, sanding
sanding, final filling
color, frames, primer
brushed primer test
2nd coat primer
holiday greetings!
finish prep, detail on dent fix
spraying primer
winter chores
1. undercoat, plating prep
2. plating, spraying color
bonnet, plate prep, cylinder head
cylinder head paint, bushes
plating saga
front frame, suspension, part 1
front suspension, part 2
front suspension, part 3
priming and painting
bonnet, part 7
painting color!
boot lid, steering wheel
gas tank
winter chores
1. firewall sundry
2. front suspension
3. steering setup
4. master cylinders/pedals
5. the rest
data plate screed
winter to spring
1. irs rebuild
2. trunk floor, harness
3. data plate (again)
data plate, door, headlights
dash vinyl, crosshatch aluminum
windshield, right door
interior, "widget"
chrome parts!
door handle details
rolling chassis
molasses rust removal
electrical, part 1
bores, thrust washers
new engine!
head differences
block differences
compression ratio
engine in place!
alternator
catchup & photos
it runs!
setback and brakes
darned close & engine diffs
driven
top and seats
driving and little stuff
|
|
|
Electrical, part 1
This section is for Ove in Norway.
It's about time to put the electrical decisions onto paper in a more presentable form. More methodical men than I would have rendered schematics first, traced everything to glassines in layers,
and then passed the signed drawings to the next person for enactment ... and, of course, improvization. The web pages that follow might even become my car's electrical schematic.
 There's always discussion about Joseph Lucas's electrical setup for British cars, and I have dug up a quote that may or may not be accurately ascribed to Lucas. "Gentlemen do not drive after dark,"
he is supposed to have said. If so, he can hardly have really been the Prince of Darkness, since he would never have been out in darkness, being a gentleman. And yet, I recall a warm night in or near
the "scenic Flint Hills" of Kansas when the Lucas electrics in my MG failed and lights became weaker and weaker. I was just lucky enough to pull into an oasis on I-35 to let my battery recharge a while.
That MG ate alternators.
There's always discussion about Joseph Lucas's electrical setup for British cars, and I have dug up a quote that may or may not be accurately ascribed to Lucas. "Gentlemen do not drive after dark,"
he is supposed to have said. If so, he can hardly have really been the Prince of Darkness, since he would never have been out in darkness, being a gentleman. And yet, I recall a warm night in or near
the "scenic Flint Hills" of Kansas when the Lucas electrics in my MG failed and lights became weaker and weaker. I was just lucky enough to pull into an oasis on I-35 to let my battery recharge a while.
That MG ate alternators.
I was too young to have been a gentleman, but I learned something about Lucas electrics.
When we removed the harnesses from the Jaguar, they all came out intact. The forward harnesses inside the bonnet and forward of the front bulkhead/firewall has been altered in part to resolve what must have been
some starter alterations and to "improve" cooling. Otherwise, the wires were unmolested by owners or repairmen. Time had taken its toll on the cloth looming and cotton and plastic coatings had suffered
from some exposure.
I've wanted to bring the car back to near what it was in 1963, except for a change of exterior color. But in part because of my old experience with Lucas electrics, I was willing to depart from the
original electrical system — especially where the changes would be obscured from sight. I've not made all of the electrical decisions even yet, at least in the final connections. I have followed a few principles in
this redesign:
- Add fused circuits
- Use relays to separate high and low loads
- Minimize length of wire runs, if possible
- Minimize use of connectors
- Localize connectors to blocks
- Upgrade wire gauge to runs with higher load
- Use LEDS where it makes sense
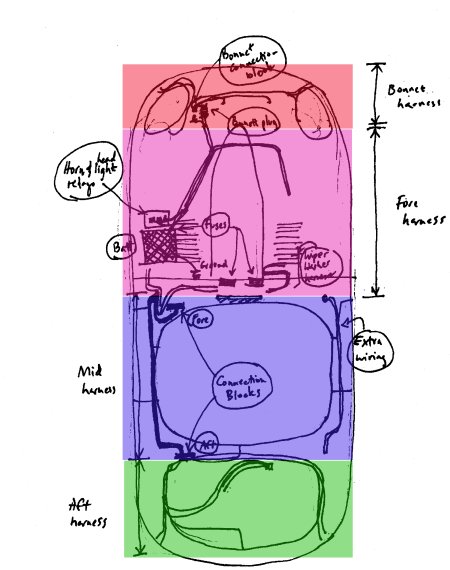
At this point, I have a total of 14 fused circuits, twelve of them emanating from the position where the fuse blocks are supposed to be, behind the center dash panel. The other two are for headlights and horns and
are situated near the battery and next to the place where the relays for the horns and the headlight beams are located. These relays sit behind the left front wheel splash guard, directly in front of the battery tray.
Those two inline fuses couldn't be placed elsewhere without lengthening the wire runs from the relays forward. I figured it was worth the inconvenience of having the fuses in unusual places to fuse the headlights and horns
separately and shorten the wire runs.
I've not mapped the locations of the original "bullet" connectors and connection blocks, but I know that in dismantling the harnesses the connections seemed to be everywhere. The wisdom of electrical troubleshooting
on the E-Type seems to amount to checking connections and cleaning connectors. Connectors do deteriorate. I wanted to make sure that I could make as few of them as possible from terminus to terminus. I also wanted to
concentrate the connections into specific locations.
The architecture of the car and its harnesses determined where the connection blocks should sit, and in fact a couple of them are originally in place. The "bonnet plug" and the internal connection block inside the
bonnet are already in place. In essense, the bonnet plug connects one harness to another in a central location. That was the principle that I used in locating connection blocks. I installed two connection blocks —
one underneath the left dash panel, near where the flasher is located. This connection block serves to connect the "fore harness" to the "mid harness" (see the illustration), though it also is often connected through
the switches and such on the dash panels. The second connection block is inside the trunk and connects the mid harness to the aft harness. I departed from the locatiion of the mid harness
by running it entirely along the car's left side. Because there might be a need at some time to run wires aft through the passenger compartment, I added four wires along the right side. These terminate inside the
trunk area and forward of the glove box. If I'm overcome by wanting to add an electrical whatever to someplace after, I figured I'd have a place to grab power or signal.
I've used spade-type connectors quite frequently, though bullet connectors still are to be found, usually to make the final connections to, say, a taillight or fan motor. And the complicated wiper motor connector block
with its conflagration of bullet connectors is still there (though as yet, I've not connected them all up).
Purists might object to the departures. As much as I respect the gentleman, I'm not intending to make the car a monument to Mr. Lucas. I'm hoping that my little changes might keep the lights brighter.
This is part one. More details later.
|
| | |
