
1963 Jaguar E-Type OTS
The story of a ground up restoration of a classic "XKE" Jaguar roadsterBasic Body Repair, POR-15 (2 - 3 November 2002)
|
|
|
|
|
|
|
| Basic Body Repair, POR-15 (2 - 3 November 2002)
Although I've categorized this as happening over the period 2-3 November, it's actually been a longer haul. But, it's been a longer haul over very short periods. Doing bondo work isn't exactly time consuming, though it is putsy. I probably worked in half-hour periods at various times over the past ten days or so on the body work. Derek also did some of this work. The most challenging (but only because it required a certain amount of planning) was the application of the POR-15 over the surface of the car. Of course, there was bondo on the body when we got the car, but we stripped the bondo off when we stripped the paint. That way, we could see the extent of the damage that was "repaired" by the bondo application. We still have areas that need metal work that were obscured by bondo applications — sometimes quite thick bondo applications! What we've got is finally beginning to look like an E-Type. It's worth noting that I've chosen to use the POR-15 as a rust-protective sealant and not as a primer. As a matter of fact I brushed it on, since spraying was just too much for the product as far as I was concerned. So, you do indeed see imperfections in the body work, though these will not be apparent at later stages. The irregularities are in fact very minor and will need little more than a good attentive block sanding after priming the surface. POR-15, for all of its virtues in protecting metals, is not a particularly wonderful primer surface (at least for those of us like me: roughly experienced car workers). It'll need a bit of reworking. The POR-15 folks have developed a good primer called Tie-Coat. It takes out much of the work of applying topcoats over POR-15, and it seems a pretty good product. I'm planning on using it on the car to prepare for painting over the POR-15.
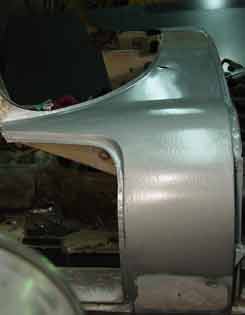
The right rear view: 
The left rear view 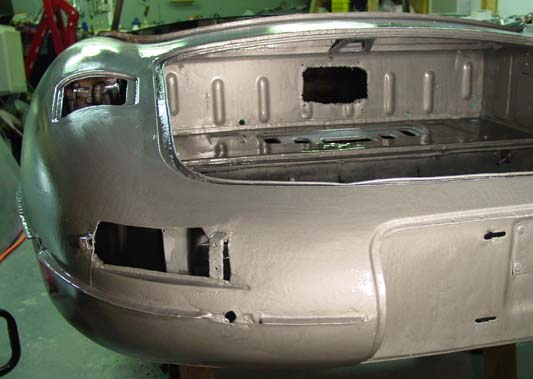
A note on the POR-15: I used the "silver" color of the product, since it is designed for metals that may need reinforcement. The POR-15 people add metal to this
I also removed the radio antenna hole and repaired the areas immediately in front of the doors.
Evidently, the doors lacked stop straps at some time (I can't recall if these hinges came with straps, as a matter of fact), and they dented
the body between the front of the doors and the rearmost section of the bonnet. I gather from what I've seen that this is a fairly common dent in this series E-Type.
The rear bulkhead is pretty much complete, with the glaring exception of the very ugly hole that was carved out to accept a stereo speaker. This Jag came with no radio, and the speaker was absent. Just the ugly hole remained. I will have to cut out the hole and the reinforcing bends and weld in a panel. I was wondering how I could fashion the reinforcements, but I've given up on that. At least this will be metal, not air ... or bondo! |
 version of the product, evidently. I do not believe that the Jaguar I have "needs additional strength" but I figured that some additional metal wouldn't
be that bad after all. The trouble with the "silver" product seems to be that it is harder to apply. It dries to a less than smooth surface, so you have a bit more
work to do in smoothing everything out. In the case of this restoration, I wasn't too worried about smoothness, since I have some work yet to do on the body, so
reinforcement sounded good.
version of the product, evidently. I do not believe that the Jaguar I have "needs additional strength" but I figured that some additional metal wouldn't
be that bad after all. The trouble with the "silver" product seems to be that it is harder to apply. It dries to a less than smooth surface, so you have a bit more
work to do in smoothing everything out. In the case of this restoration, I wasn't too worried about smoothness, since I have some work yet to do on the body, so
reinforcement sounded good.
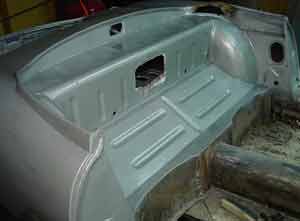 The lower section of the top part of the bulkhead cover — that is, the area where the outer sill meets the body panel — I have left alone. I am concentrating
on the upper sections of the body, since it will be easier to do the lower "hemisphere" of the body when I have flipped the body over. I will do the body work in the
lower section after the outer sill on this side is installed (and on the other, most probably).
The lower section of the top part of the bulkhead cover — that is, the area where the outer sill meets the body panel — I have left alone. I am concentrating
on the upper sections of the body, since it will be easier to do the lower "hemisphere" of the body when I have flipped the body over. I will do the body work in the
lower section after the outer sill on this side is installed (and on the other, most probably).